Use Backup with Jira Sandbox: Practical Guide to Moving Data

SUMMARY
- Despite prior testing, there’s still a risk that changes to your production Jira site may yield unpredictable results.
- Jira Sandbox is meant to solve this problem, but the native deployment to production moves configuration only, never work items.
- Backup solution like GitProtect fills native Jira sandbox gaps with work items in both directions and restores from any past point in time.
- Use GitProtect and sandbox to recreate production for tests, inspect past copies for incident analysis, promote new spaces with work items, and more.
A Jira admin tests an automation rule on a single work item, and it works. In production, the same rule runs against a couple of hundred work items selected by JQL and updates them the wrong way. Next comes a hunt through change history to undo it.
The Jira sandbox exists to catch problems like this before they reach production. Yet Atlassian’s native tools move only today’s data into the sandbox and only configuration back out.
Below, you’ll learn how to set up a sandbox and how a backup tool like GitProtect fills the native gaps in selected practical workflows.
What the Jira sandbox does natively and where it stops
The Jira sandbox is an isolated copy of your Jira Cloud environment with its own URL, mapped to one production site. Changes you make there don’t touch production users or data. Atlassian offers the sandboxing feature in the Premium and Enterprise plans, and the number of free sandboxes depends on the tier. Learn more
Natively, data moves in two directions, and each direction has its own tool.
Production to sandbox: data copy
You can copy all spaces or only selected ones, with or without attachments. A full copy overwrites whatever the sandbox already holds, and on large sites it can take up to 14 days. A partial copy is faster, but Atlassian doesn’t guarantee that identifiers such as custom field IDs and board IDs match production. As a result, JQL filters and automation rules that reference those IDs may behave differently in the sandbox. Also, Atlassian doesn’t copy webhooks or OAuth tokens, which keeps the sandbox from affecting production integrations.
Sandbox to production: configuration deployment
Since July 2026, Sandbox Configuration Deployment has been in open beta for Jira and Jira Service Management. It deploys selected configuration (workflows, custom fields, schemes, automation rules, schemas, and more) to production or to another sandbox. Before it runs, it checks dependencies and validates the changes.
The feature has a few limits worth knowing before you plan around it:
- It moves configuration only, so work items never travel from sandbox to production.
- It supports only company-managed spaces.
- It needs a sandbox refreshed with a full data copy made on or after 7 December 2025 for Jira (7 May 2026 for Jira Service Management).
- Atlassian advises against using it for configuration that reached the sandbox through backup restores or Marketplace apps.
- Some changes still need manual follow-up in production, such as a removed custom field option, a renamed space, or connections in automation rules.
One more detail matters for planning. Sandboxes aren’t covered by the SLAs that apply to production, and Atlassian can’t restore a sandbox once it’s deleted.
How a backup tool fits in
A backup tool works independently of the sandbox feature. It restores data from any backup copy to any connected Jira organization, so it fills the gaps the native tools leave.
| Native data copy | Native configuration deployment | Backup tool such as GitProtect | |
| Direction | Production to sandbox | Sandbox to production or another sandbox | Any direction (backup & restore), including to the original or another Jira organization |
| Work items | Yes | No | Yes |
| Point in time | Current state only | Current state only | Any backup copy you keep |
| Scope | All or selected spaces | Selected configuration | All, selected, or rule-based spaces; individual items |
| Plans | Premium, Enterprise | Premium, Enterprise | Doesn’t require Premium or Enterprise |
Without Premium or Enterprise, there’s no native sandbox. However, you can create a separate Jira site, restore your data there with GitProtect, and use it as a sandbox. Keep in mind that this second site is a separate Jira subscription, so your organization pays for it like for any other site (see Jira pricing).
How to set up a Jira sandbox in 4 steps
You need organization admin rights and a Premium or Enterprise plan. Creating the sandbox itself takes up to 30 minutes.
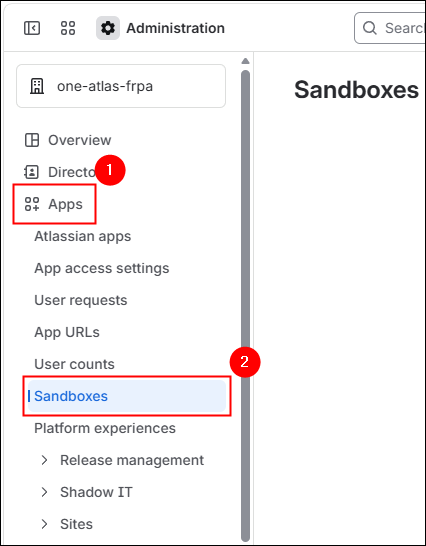
- Go to Atlassian Administration (admin.atlassian.com) and select your organization. Then select Apps > Sandboxes.
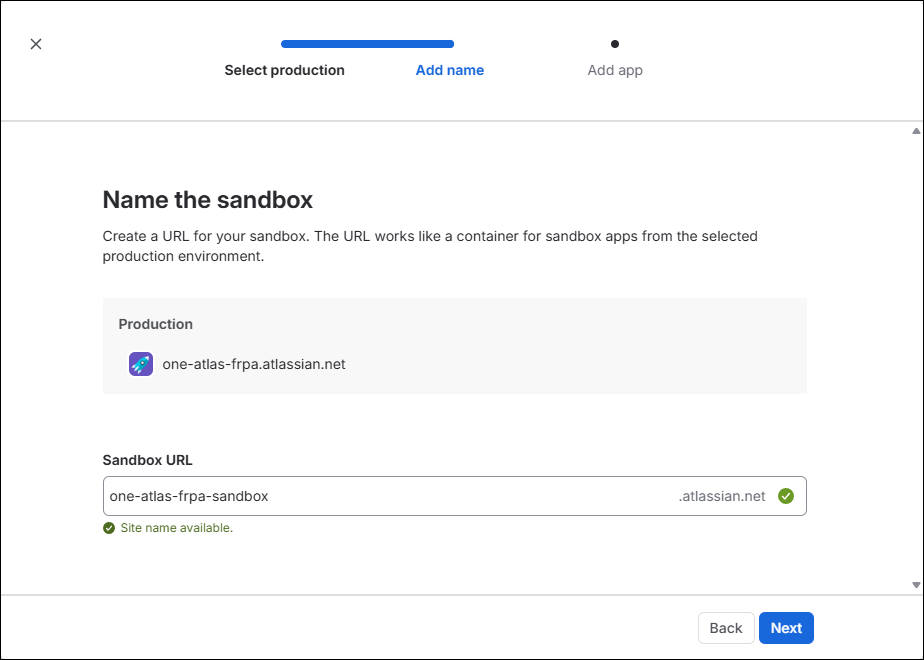
- Select Create sandbox (or Create your first sandbox), choose the production site to map it to, and enter a name. The name becomes part of the sandbox URL. Then select Jira (and Jira Service Management, if you use it) as the app. This creates an empty sandbox, and no production data is copied yet.
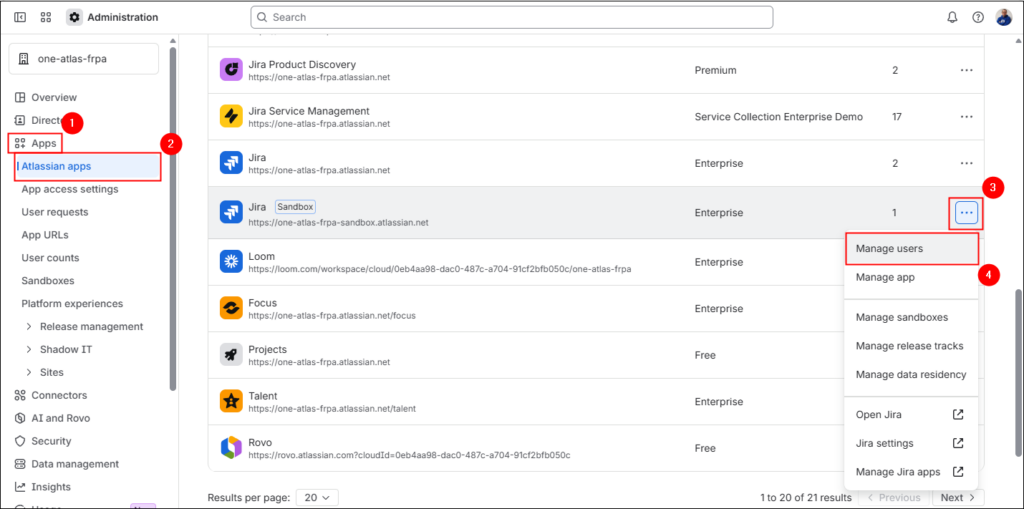
- Give your testers access. Go to Apps > Atlassian apps, click More actions (…) > Manage users next to the sandbox, and add people to the sandbox groups.
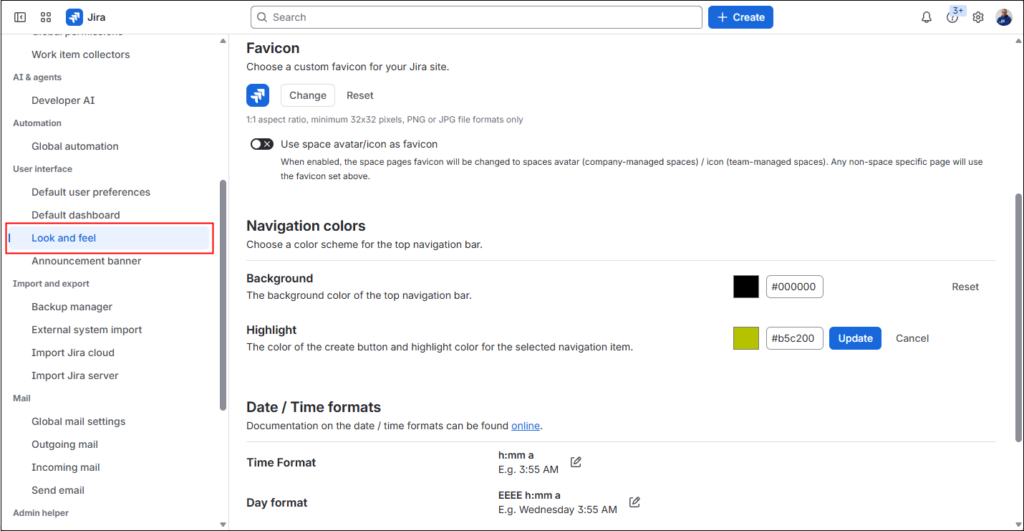
- Make the sandbox easy to tell apart from production. A different site title, color scheme, and announcement banner help testers notice where they are, since the URL is otherwise the only visible difference. Go to Apps > Atlassian apps, click More actions (…) next to your sandbox > Jira settings. On the new tab, under the User interface menu group, choose Look and feel and customize the settings as needed.
Keep in mind that the sandbox holds real production data, so the same access rules and data protection obligations apply as in production.
How to prepare GitProtect for sandbox work
Before you move any data, prepare GitProtect for sandbox work. If you’re already using GitProtect, you can sign in here. If you would like to play with the demo experience (no credit card required), go there instead.
Integrate the production and sandbox sites
You need to connect your production Jira site and the sandbox site (or a second Jira site) to GitProtect.
For this, follow these steps, keeping the following in mind:
- Check the permissions you need for the integration first.
- For each site (production and sandbox), use the relevant instance URL, when providing the integration details.
- You can use the same classic API token for both production and sandbox sites. To create it, go to https://id.atlassian.com/manage-profile/security/api-tokens.
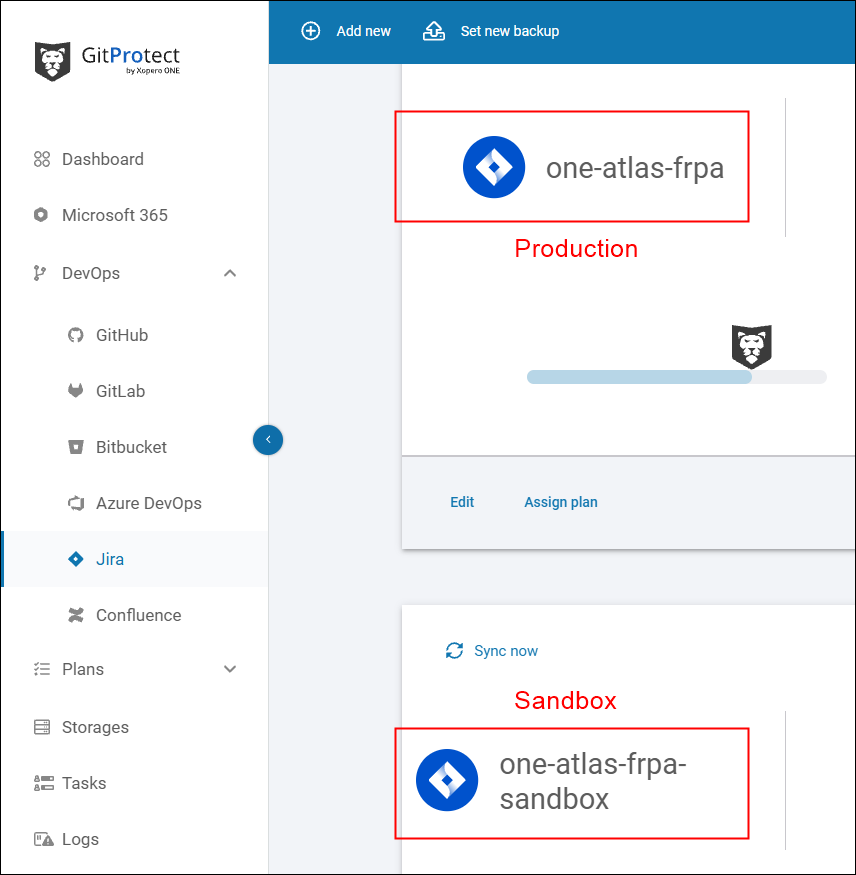
Completing the integration, you should have the two distinct organizations listed in GitProtect (DevOps > Jira):
Create a Jira backup plan
To create a backup plan for your Jira production site, follow these steps. Mind the following:
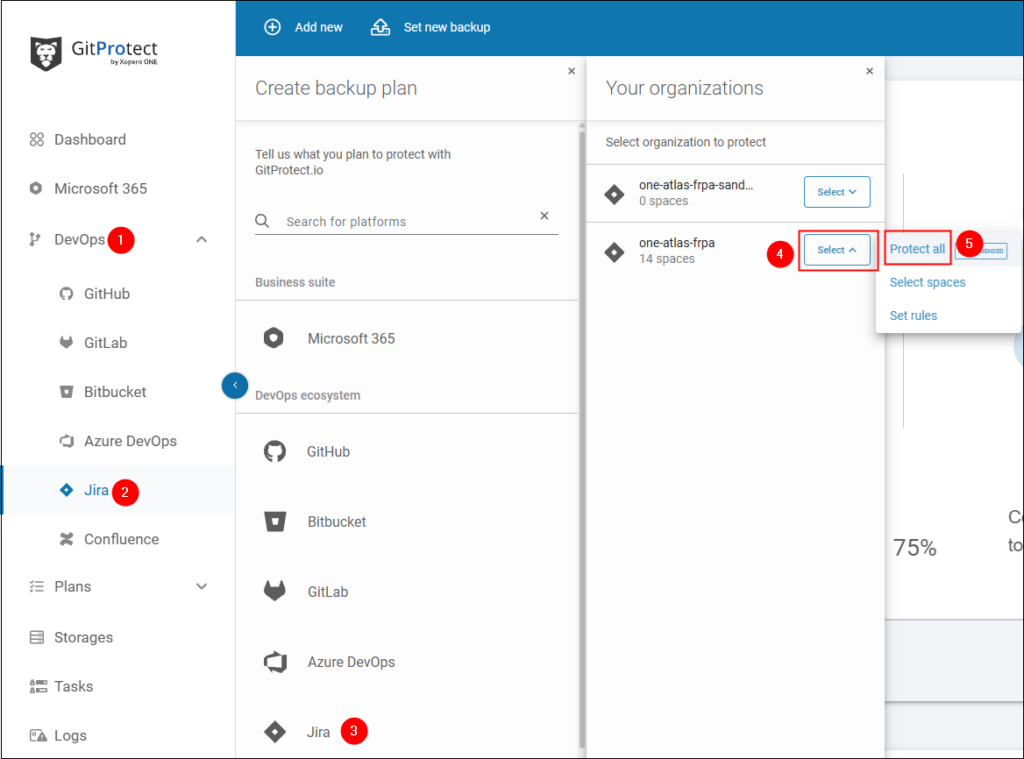
- Next to your production site, click Select > Protect all to back up all spaces in your organization.
- Make sure to set up the scheduler, so that you always have the freshest copy and can go back to a desired point in time.
- Configure the remaining aspects of the backup plan as needed—choose storage for your backups and use advanced features like encryption or deduplication for greater security and optimized backup performance.
Scenario 1: Recreate production in the sandbox to test changes safely
A test tells you something only when the sandbox looks like production. So before you try a new Marketplace app or a complex automation rule, restore all production spaces into the sandbox from your latest backup.
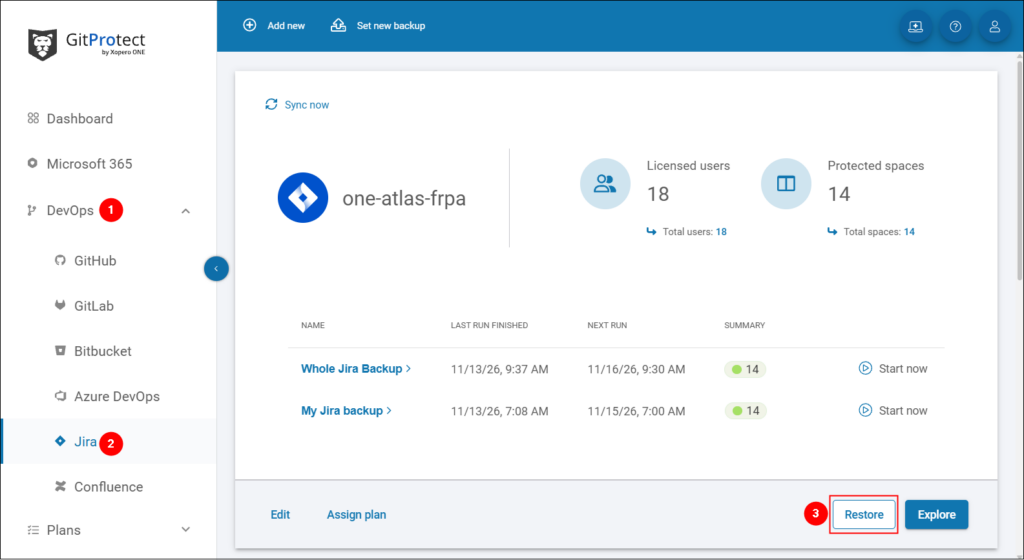
- In GitProtect Management Service, go to DevOps > Jira and click Restore next to your production organization.
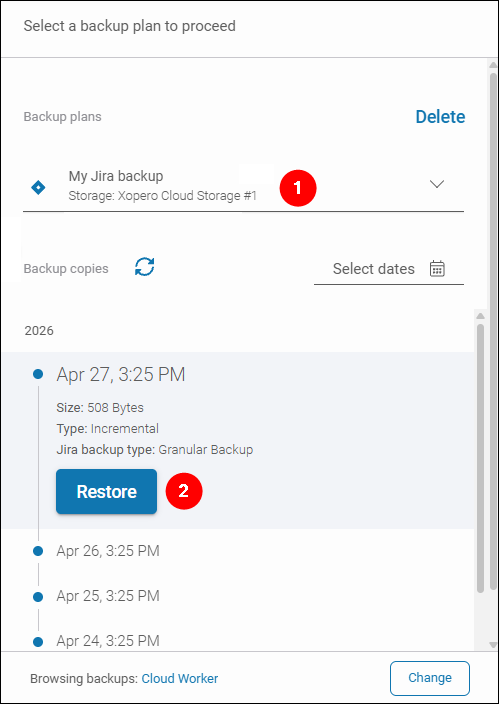
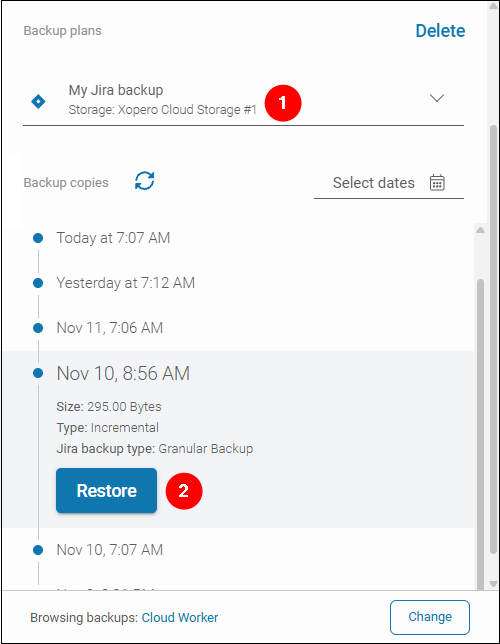
- Select the backup plan you created in the previous section, choose the latest backup copy by date, and click Restore.
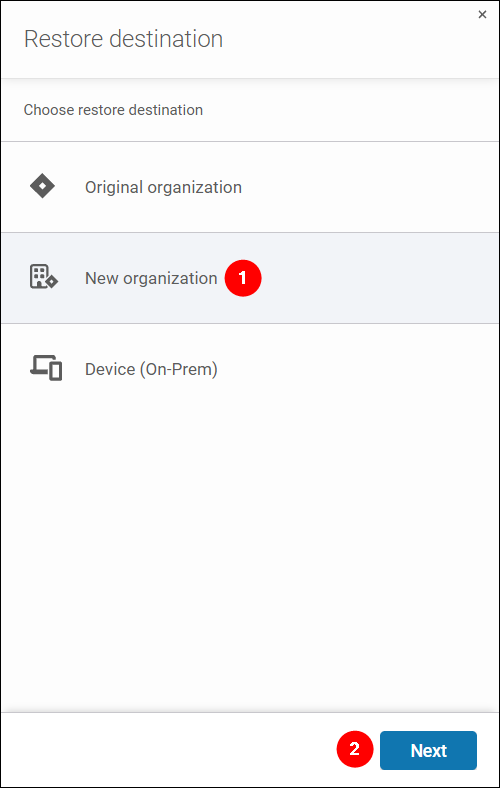
- For the restore destination, select New organization and click Next to proceed.
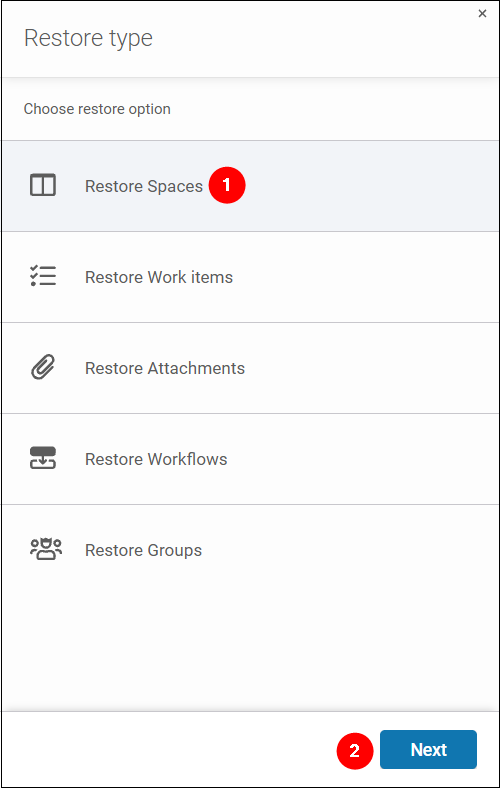
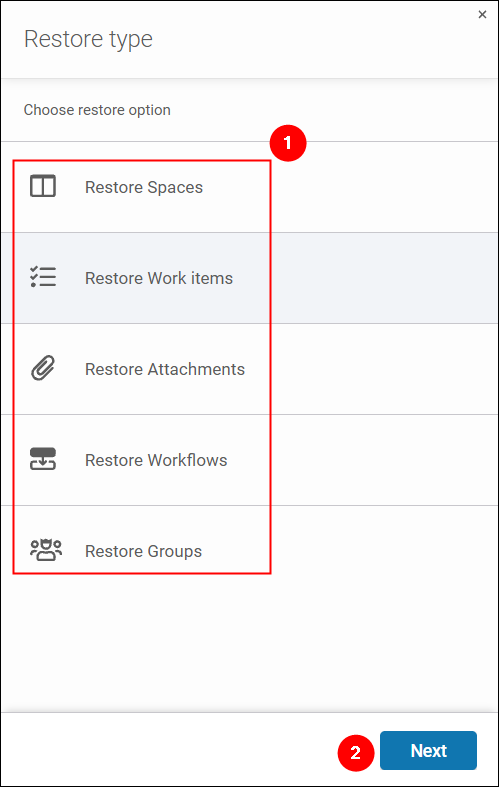
- For resources to restore, select Restore Spaces, and click Next. Select all spaces by using the top checkbox on each space listing page. To confirm your choice, click Proceed.
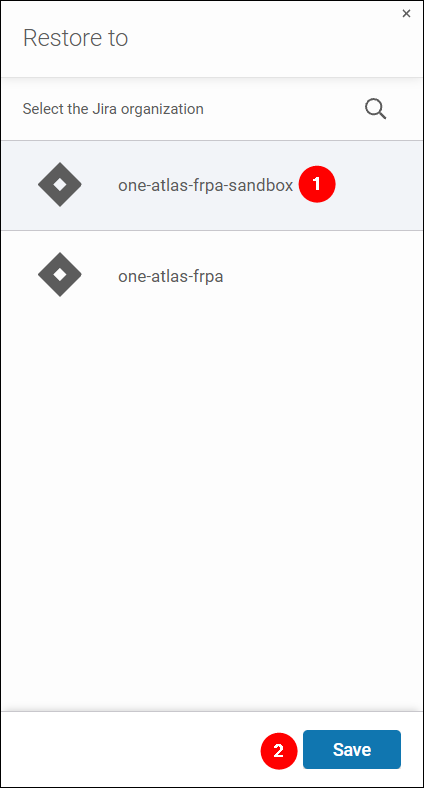
- Choose the restore organization – your sandbox site and click Save.
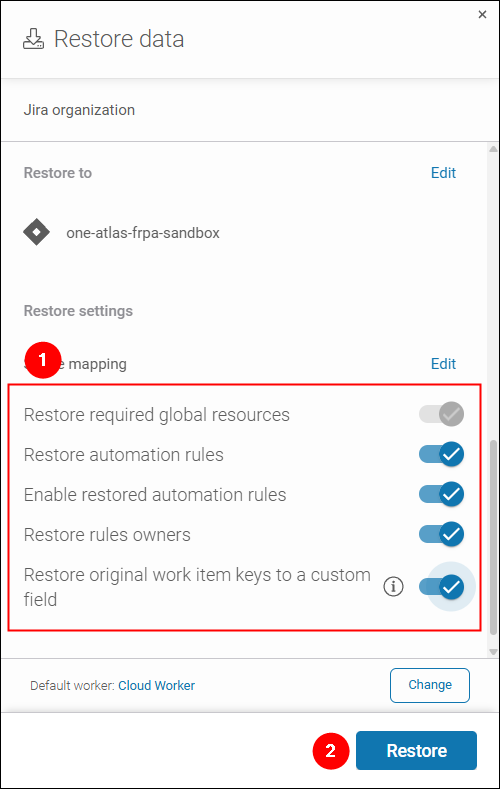
- In Restore data aside, under Restore settings, decide whether to restore automation rules and their owners. Enable Restore required global resources, so the shared configuration the spaces depend on comes along. Finally, click Restore and follow the progress in the Tasks tab (main navigation menu).
Once you have the production data moved to the sandbox, you can install an app for testing, or enable the rule in the sandbox and let it run against real spaces, workflows, and work items.
If the test goes wrong (say, the rule edits half of your work items), restore the same backup copy again. Each test round then starts from an identical baseline, which makes results easy to compare.
The same restore proves your backups work
Every restore into the sandbox is also a restore test. Check that spaces, work items, attachments, and workflows arrived complete, and record how long the restore took against your recovery time objective (RTO). That record is useful evidence for NIS2, DORA, SOC 2, and ISO 27001 audits.
Regular tests matter because under the Atlassian Cloud shared responsibility model, Atlassian keeps the platform running while you remain responsible for your data. A backup you’ve never restored gives you no proof that recovery works.
💡 More ways to use a recreated production
– Give new Jira admins a realistic training environment.
– Check how upcoming Atlassian changes affect your configuration before they reach production.
Scenario 2: Investigate an incident in a past snapshot
A workflow lost a transition, a bulk edit overwrote field values, or work items vanished, and nobody knows exactly what changed.
Instead of guessing, restore the affected space as it looked before the incident and compare it with production. The sandbox is the right place for this, because a second copy of the space in production would confuse users and could trigger notifications and automation.
The restore flow is the same as in Scenario 1, with a few different choices:
- Start the restore again from DevOps > Jira for your production organization and pick the backup copy made just before the incident. You can use the date picker to select a specific date range. Next, click Restore.
- Click New organization (the sandbox) as the destination.
- In the Restore type aside, choose the type of resources that are affected by the incident – space(s), work item(s), etc. and click Next. In the next step, choose the resources one by one, and click Proceed.
- Now, select the target organization (your sandbox) and click Save.
- In the Restore data aside, configure restore settings (e.g. related to restoring original work item keys) and click Restore to start the process.
Note: The restored work items get new keys in the sandbox, while their original keys land in the GitProtect_Original Key custom field. That makes it easy to match each restored item to its production counterpart and compare field values, comments, and attachments.
Once you know what’s missing, bring back only that. Granular restore lets you pick individual work items, including subtasks, and restore them to the original organization. Our team used exactly this approach to recover a work item that Atlassian could no longer restore.
💡 More ways to use past snapshots
– Review what a bad bulk edit or automation run changed before you decide how to fix it.
– Answer an auditor’s question about how a configuration looked on a given date.
– Check a deleted space’s contents before restoring it to production.
Scenario 3: Promote a new space from sandbox to production with its work items
Say you’re building a service space for a new team. You set up workflows, request types, and automation rules in the sandbox, then a pilot group works in it for two weeks.
By launch day, the space holds templates, sample requests, and real pilot work. Atlassian’s native deployment can move a new space’s configuration to production, but not its work items. A GitProtect restore moves both.
Here’s how to move everything from the sandbox to production:
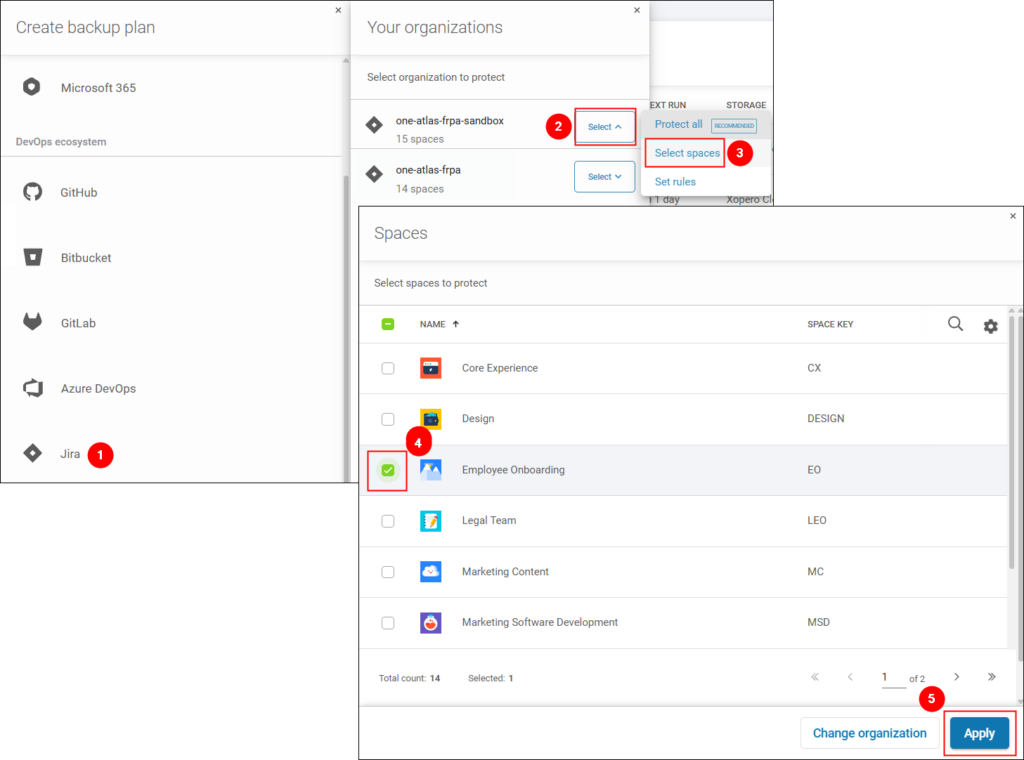
- Create a granular backup plan for the sandbox organization, following these instructions. Remember to click Select next to your sandbox organization, choose Select paces, and pick the new space, then run the plan.
- Make sure the latest production backup finished successfully. It’s your rollback point if the new space’s global resources clash with production settings.
- Go to DevOps > Jira, click Restore next to the sandbox organization, choose the copy created in step 1. In the aside that opens, select the backup plan from the dropdown list, choose the latest copy, and click Restore next to it.
- Select New organization as the destination and the new space as the resource (Restore Spaces) to restore.
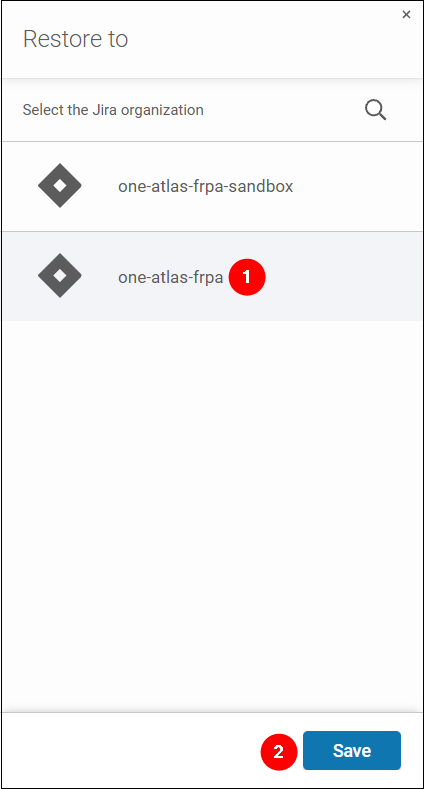
- Under Restore to, choose your production organization and click Save.
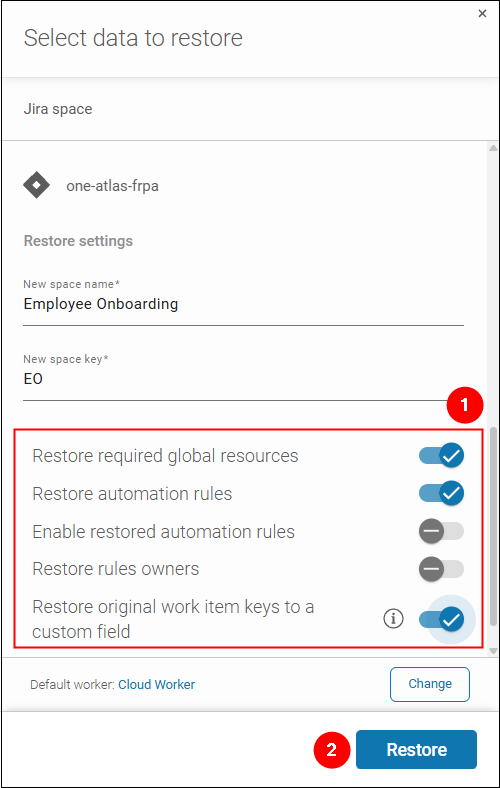
- In Restore data, choose whether to restore automation rules and their owners, and so on. Click Restore to push your new space to production.
The sandbox backup plan has value beyond this one restore. Sandboxes don’t get production SLAs, and a deleted sandbox can’t be recovered by Atlassian. With a backup plan in place, weeks of admin work in the sandbox stay safe, even if someone deletes the sandbox.
💡 More ways to promote work from the sandbox
– Launch proof-of-concept spaces for new teams together with their pilot data.
– Roll out new Jira Service Management spaces with Assets and automation rules.
– Move spaces between Jira sites when you split or consolidate organizations.
Backup at both ends of the sandbox loop
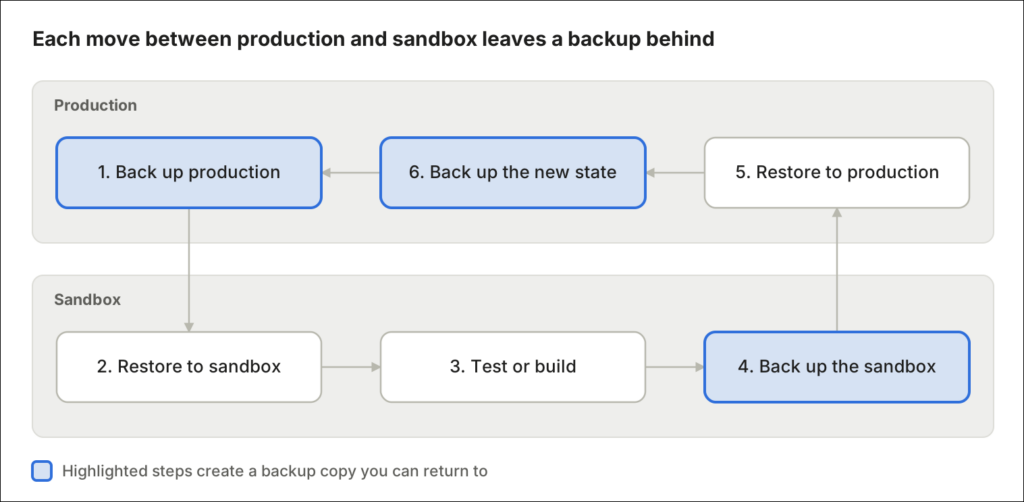
A sandbox is only as useful as the way data gets in and out of it. Atlassian’s native tools copy today’s production into the sandbox and deploy configuration back. A backup tool adds what they leave out: work items in both directions, any point in the past, and a recoverable copy of each environment.
In practice, the loop looks like this. You back up production, restore it to the sandbox, and test or build there. Then you back up the sandbox, restore the result to production, and the next production backup captures the new state. Each step leaves a copy you can return to.
To try these workflows on your own Jira data, start a free 14-day GitProtect trial and restore your first space to a sandbox.