Bitbucket to GitLab Migration in a Few Simple Steps
Moving data from Bitbucket to GitLab is usually dictated by the need to streamline the company’s development processes. It also involves the desire to unify the toolset and the benefits of using GitLab’s versatile DevOps features.
A foundation of a smooth transition lies in a detailed roadmap for developers and admins. It includes all technical measures necessary to minimize disruptions and mitigate unwanted challenges. As always, the whole process begins with preparations.
Key preparations for the migration process
The first step is to assess your current environment in Bitbucket. This will allow you to determine the scope of your dataset and maintain continuity during the migration. It can also serve as a form of audit before making a business change.
Current environment assessment
To properly assess your Bitbucket platform for migration purposes, you need to pay attention to:
- repository inventory
- repos size and complexity
- active users and permissions
- CI/CD pipelines.
Repository inventory
You can approach this step programmatically by utilizing Bitbucket REST API to obtain the list of your repos. You won’t overlook any directory, even in large workspaces.
An example API call may look like this:
curl -u <username>:<app_password> \
https://api.bitbucket.org/2.0/repositories/<workspace>
Next, to extract repository names, types (private, public, fork), and links, you should parse the JSON response. If you plan to use a Python snippet (an example):
import requests

repos_url = "https://api.bitbucket.org/2.0/repositories/<workspace>"
response = requests.get(repos_url, auth=('<username>', '<app_password>'))
repos = response.json()
for repo in repos['values']:
    print(f"Repo Name: {repo['name']}, Type: {repo['is_private'] and 'Private'
    or 'Public'}")
Repository size and complexity
To assess repository size and branching structure, you can utilize the git clone –mirror command or Bitbucket’s API. Migrating big repos, all the more so with long commit histories, may require, e.g., pruning unused branches or history compression.
For instance, fetching repo size:
git clone --mirror https://<username>@bitbucket.org/<workspace>/<repo>.git
du -sh <repo>.git
Further, use the git branch and git log to analyze branching complexity. To identify unused tags or orphaned branches you can also utilize custom scripts.
Active users and permissions
Dealing with users, you’ll export the entire list of collaborators, including their roles. To retrieve permissions, you can use an API from Bitbucket.
curl -u <username>:<app_password> \
https://api.bitbucket.org/2.0/repositories/<workspace>/<repo>/permissions/users
Next, it’s time for role mapping. For that, documenting all roles (admin, write, or read access) for all repositories is a necessity. You must determine how such details will map to GitLab’s permission model.
CI/CD pipelines
For CI/CD pipelines, you’ll need to export current CI/CD configurations from Bitbucket Pipelines – for each repo. For this purpose, use the bitbucket-pipeline.yml file to evaluate workflows:
- build stages
- deployment scripts
- environment variables.
The Bitbucket pipeline YAML snippet can be formatted like this (an example):
pipelines:
  default:
    - step:
        name: Build
        script:
          - npm install
          - npm run build
It’s crucial to compare the extended pipeline structure with the syntax of the .gitlab-ci.yml file to spot potential gaps or areas for optimization.
Defining the target state
At this stage, you dive a bit deeper into your GitLab repos elements – planning group and project structures, CI/CD pipeline identification, and setting a timeline with milestones.
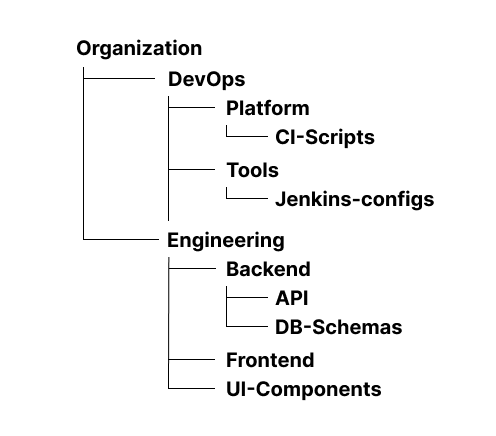
Plan GitLab group and project structure
One of the things that differentiates GitLab from Bitbucket is the organization of repos into groups and subgroups. You can plan your structure based on your organization’s needs, including:
- Top-level groups: These represent business units or departments.
- Subgroups: They relate to projects, teams, or products.
- Projects: The last group contains repositories.
In practice, the structure described above may look like this:
When creating a structure, planning namespace mappings is necessary to make sure repos align logically. You can use the GitLab API to automate the process.
curl --header "PRIVATE-TOKEN: <your_access_token>" \
      --data "name=Backend&path=backend&namespace_id=<group_id>" \
      "https://<gitlab_instance>/api/v4/projects"
Identifying CI/CD pipeline features
For this purpose, it’s recommended to (a necessity) compare Bitbucket Pipelines with GitLab’s CI/CD features, considering:
| Bitbucket features – – – – – – – – – – – – – – – – – – – – – – – – – – – sequential steps – parallel builds – deployment environments | GitLab features – – – – – – – – – – – – – – – – – – – – – – – stages – jobs – dependencies – built-in runners |
Such a pipeline conversion may be realized utilizing the YAML structure.
| Bitbucket YAML | GitLab YAML |
| pipelines: default: – step: name: Build script: – mvn clean install | stages: – build build-job: stage: build script: – mvn clean install |
Setting a timeline with milestones
You can divide this particular step into 5 phases. Their number, given time, and scope of activities depend strictly on your needs and the mitigation volume.
Phase 1. Repository preparation
- Inventory all repos and CI/CD pipelines.
- Clean up unused branches, tags, and obsolete pipelines.
Phase 2. Initial migration
- Migrate smaller repositories to test GitLab configurations.
- Validate repository structures, permissions, and access levels.
Phase 3. CI/CD migration and testing
- Migrate and test CI/CD workflows in GitLab.
- Use GitLab’s pipeline lint to validate .gitlab-ci.yml.
Phase 4. Full migration and final testing
- Complete repository migration.
- Conduct final validations to guarantee data integrity and access control.
Phase 5. Decommission Bitbucket
- Mark Bitbucket repositories as read-only. Archive or delete after approval.
Bitbucket to GitLab migration steps
All pre-migration preparations described so far should allow you to initiate the migration process confidently. Especially if your team took care of every detail. The migration process starts with setting up GitLab.
Set up GitLab
Given your business and chosen IT stack, you can install GitLab on-premises or sign up for GitLab online (SaaS).
For an on-premise installation, download and install the GitLab package from GitLab’s repository. Installation options include Docker, Kubernetes, and Linux package managers like apt or yum.
In the Ubuntu distro, the installation approach looks like this:
curl -s https://packages.gitlab.com/install/repositories/gitlab/gitlab-ee/script.deb.sh |
sudo bash
sudo apt-get install gitlab-ee
sudo gitlab-ctl reconfigure
Sign up at GitLab.com and create a new group or project for SaaS.
Configure project namespaces and groups
Having the platform working, define top-level groups to represent organizational units (departments, teams, or clients). Use subgroups to align with product lines or projects.
Next, automate group creation with GitLab’s API:
curl --header "PRIVATE-TOKEN: <your_access_token>" \
  --data "name=<group_name>&path=<group_path>" \
  "https://<gitlab_instance>/api/v4/groups"
Set up user accounts and permissions
Now, import users from Bitbucket using the GitLab API. Assign roles based on Bitbucket permissions.
To automate user assignment, use:
curl --header "PRIVATE-TOKEN: <your_access_token>" \
  --data "user_id=<user_id>&access_level=<access_level>" \
  "https://<gitlab_instance>/api/v4/projects/<project_id>/members"
If you use GitLab SaaS, integrate with SSO providers or LDAP for seamless user management.
Export repositories from Bitbucket
When the above elements are set, it’s time to prepare Bitbucket repos to export.
Clone repositories
You should start by cloning repos using the—-mirror flag. This will preserve all branches, tags, and references, which is crucial for an accurate migration.
Execute the git clone –mirror command for each repository.
git clone --mirror https://<username>@bitbucket.org/<workspace>/<repo>.gitYou can also automate cloning for multiple repositories using a script, for example (Bash):
# Define workspace and credentials
WORKSPACE="<workspace>"
USERNAME="<username>"
APP_PASSWORD="<app_password>"

# List of repositories
REPOS=("repo1" "repo2" "repo3")

# Loop through repositories and clone each
for REPO in "${REPOS[@]}"; do
      echo "Cloning $REPO..."
      git clone --mirror https://${USERNAME}:${APP_PASSWORD}@bitbucket.org/${WORKSPACE}/${REPO}.git
done
The script above iterates over a predefined list of repositories and clones each one.
In the next step, verify repository integrity post-clone.
Check the size:
du -sh <repo>.gitConfirm branches and tags:
git show-refArchive metadata
Metadata includes pull requests, issues, comments, and other repository-related data. The Bitbucket REST API is necessary to extract such information.
Pull requests
Using the API mentioned above, export pull requests:
curl -u <username>:<app_password> \
 	https://api.bitbucket.org/2.0/repositories/<workspace>/<repo>/pullrequests
It’s worth noting that you may also need to handle paged results for large databases, as pagination applies.
curl -u <username>:<app_password> \ "https://api.bitbucket.org/2.0/repositories/<workspace>/<repo>/pullrequests?page=2"To save the output to a file (e.g., for later use), utilize:
curl -u <username>:<app_password> \
 	https://api.bitbucket.org/2.0/repositories/<workspace>/<repo>/pullrequests > pullrequests.json
The command retrieves pull requests in JSON format. For example:
{
  "values": [
	{
  	"id": 1,
  	"title": "Update README",
  	"state": "MERGED",
  	"author": {
    	"display_name": "John Doe"
  	},
  	"created_on": "2023-01-15T12:34:56Z",
  	"updated_on": "2023-01-18T08:45:00Z"
	}
  ]
}
Issues
Fetch issues using a similar API request.
curl -u <username>:<app_password> \
 	https://api.bitbucket.org/2.0/repositories/<workspace>/<repo>/issues
In the same way, as in the above pull request case, you can handle pagination and save output in JSON format. However, you can convert JSON files to CSV format to make the review more manageable.
A Python script, for example:
import json
import csv

# Load JSON data
with open('issues.json', 'r') as file:
	data = json.load(file)

# Write to CSV
with open('issues.csv', 'w', newline='') as csvfile:
	fieldnames = ['id', 'title', 'state', 'created_on,' 'updated_on']
	writer = csv.DictWriter(csvfile, fieldnames=fieldnames)

	writer.writeheader()
	for issue in data['values']:
    	writer.writerow({
        	'id': issue['id'],
        	'title': issue['title'],
        	'state': issue['state'],
        	'created_on': issue['created_on'],
        	'updated_on': issue['updated_on']
    	})
Import repositories to GitLab
Start importing repos to GitLab by pushing cloned repositories to GitLab using the –mirror flag.
git push --mirror https://<gitlab_instance>/<group>/<repo>.gitTo automate project creation and repository imports, use GitLab’s API. Take a script for bulk import as an example:
for repo in $(cat repos.txt); do
  curl --header "PRIVATE-TOKEN: <your_access_token>" \
   	--data "name=$(basename $repo)&namespace_id=<group_id>" \
   	"https://<gitlab_instance>/api/v4/projects"
done
Migrate CI/CD pipelines
Start the CI/CD pipeline migration process with their conversion.
Pipeline conversion
Before transforming Bitbucket Pipelines to GitLab CI/CD, you should analyze the structure and adapt stages, jobs, and steps to GitLab’s syntax.
1. Review the Bitbucket pipeline (bitbucket-pipelines.yml)
For example:
pipelines:
  default:
	- step:
    	name: Build and Test
    	script:
      	- npm install
      	- npm run build
      	- npm test
	- step:
    	name: Deploy
    	script:
      	- npm run deploy
  branches:
	feature/*:
  	- step:
      	name: Feature Branch Build
      	script:
        	- npm install
        	- npm run build
2. Map to GitLab’s syntax
GitLab CI/CD uses (.gitlab-ci.yml) with stages and jobs. You need to convert Bitbucket’s step into GitLab’s job under a specific stage.
The converted GitLab Pipeline may look like this:
stages:
  - build
  - test
  - deploy

build-job:
  stage: build
  script:
	- npm install
	- npm run build

test-job:
  stage: test
  script:
	- npm test

deploy-job:
  stage: deploy
  script:
	- npm run deploy

feature-branch-build:
  stage: build
  script:
	- npm install
	- npm run build
  only:
	- /^feature\/.*$/
As you can see:
- stages are defined explicitly: build, test, deploy
- each Bitbucket step becomes a GitLab job
- to replicate Bitbucket’s branch-specific pipelines only, or excerpts are used in GitLab. For instance, only: – /^feature\/.*$/ guarantees jobs run on feature branches.
3. Handle environment variables
You need to migrate the environmental variables defined in Bitbucket to GitLab manually. In Bitbucket, they are typically defined in repository settings or bitbucket-pipelines.yml.
As for GitLab, you can add environment variables via the GitLab UI or API:
- navigate to Settings → CI/CD → Variables
- define each variable (e.g., API_KEY, NODE_ENV)
Use the GitLab API to set variables:
curl --header "PRIVATE-TOKEN: <your_access_token>" \
 	--data "key=API_KEY&value=your_api_key&protected=true" \
 	"https://<gitlab_instance>/api/v4/projects/<project_id>/variables"
As for variable mapping, it looks like this:
| Bitbucket BITBUCKET_ENV_VAR script: – echo $BITBUCKET_ENV_VAR | GitLab GITLAB_ENV_VAR script: – echo $GITLAB_ENV_VAR |
4. Validation process
Before moving further, it’s a recommended practice (if not a necessity) to validate pipeline migration.
In the first step, lint the GitLab CI/CD pipeline. Validate ..gitlab-ci.yml syntax using (Gitlab’s CI/CD) lint tool before you push the file.
- Go to CI/CD → Pipeline Editor → Lint.
- Paste the .gitlab-ci.yml content and check for errors.
The alternative approach involves API:
curl --header "PRIVATE-TOKEN: <your_access_token>" \
 	--header "Content-Type: application/json" \
 	--data '{"content": "<your .gitlab-ci.yml content>"}' \
 	"https://<gitlab_instance>/api/v4/ci/lint"
Next, test pipelines. Commit the .gitlab-ci.yml to the repo and trigger a pipeline run:
git add .gitlab-ci.yml
git commit -m "Add GitLab pipeline"
git push
Remember to monitor the pipeline execution in CI/CD → Pipelines.
Before completing the whole pipeline migration step, adjust and refine. In other words:
- address any discrepancies between the behavior of the Bitbucket pipeline and the GitLab one
- make sure that deployment stages are executed correctly and verify all external integrations (e.g., artifact repos, deployment servers).
During the described activities, consider pipeline complexity, like multiple dependencies or conditional stages. In this case, utilize GitLab’s rules and needs features.
An example:
build:
  stage: build
  script:
	- npm install
	- npm run build
  rules:
	- if: '$CI_COMMIT_BRANCH == "main"'
In GitLab, you can enable caching for dependencies:
cache:
   paths:
      - node_modules/
Finally, if Bitbucket pipelines use artifacts, map them to GitLab’s artifacts syntax:
build:
  stage: build
  script:
	- npm install
	- npm run build
  artifacts:
	paths:
  	- dist/
Migrate all needed issues and pull requests
As you probably know, the GitLab platform doesn’t offer any feature that might help you transfer issues of pull requests directly from the Bitbucket. That leaves custom methods to rely on. In turn, you must transfer issue details, comments, and progress status(es) manually – or automatically (with the proper tool).
Custom scripts for migration
A suitable method to migrate issues from Bitbucket to GitLab – in addition to a third-party tool – might be a Python script. It should include enhancements for error handling, pagination, and support for issue comments.
However, if issues in Bitbucket have file attachments, you should download them and re-upload them to GitLab. Migrating comments on each issue requires a separate (additional) API call.
For example, you can extend the script by adding:
bitbucket_comments_url = f"{bitbucket_issues_url}/{issue['id']}/comments"
comments = requests.get(bitbucket_comments_url, auth=auth).json()
Third-party tools, such as Bitbucket to GitLab migration utilities or Python libraries (e.g., python-gitlab), can be helpful when you plan to automate the process. The best choice among such tools will be GitProtect.io.
Test and validation
In this step, you focus mainly on dry run and testing your migration outcome. It’ll involve a dry run, data validation, pipeline execution, and permission testing at the end.
Dry run
Select test repositories with varied characteristics, e.g., small and large, with CI/CD pipelines. Perform the migration steps for these repos to evaluate time, complexity, and potential errors.
Data validation
You can start by validating the commit history for completeness.
git log --onelineNext, compare branch and tag structures between Bitbucket and GitLab.
git branch -r
git tag
Confirm that the issue count, description, and labels match. Use GitLab’s issue listing API for validation.
curl --header "PRIVATE-TOKEN: <your_access_token>" \
 	"https://<gitlab_instance>/api/v4/projects/<project_id>/issues"
After it’s done, you can verify whether the history of pull requests (from Bitbucket) is accurately represented in GitLab merge requests.
Pipeline execution
For proper execution, trigger pipelines in GitLab and validate all stages, jobs, and environment variables in the CI/CD Pipelines section. Then, check all necessary permissions.
Permission testing
Log in with different user accounts to test all required permissions to confirm role-based access control. Include group and project permissions to verify if they align with expectations (source system).
During the test phase, any findings should be gathered in the document. This is essential. The file should address discrepancies or errors before proceeding with the full-scale migration.
Complete Bitbucket do GitLab migration in just a few clicks
During our consideration, we mentioned the third-party solution and GitProtect tool. The latter provides a way to perform the described migration much faster, easier, and in a far more predictable and safe manner.
GitProtect.io is an all–scenario–ready DevOps Backup and Disaster Recovery system. It offers one central management console and lets you keep and restore any data you need, including projects, labels, issues, pull requests, pipelines, etc.
By offering cross-restore capabilities, the software gives you the freedom to migrate between vendors easily:
- GitHub
- GitLab
- Bitbucket
- Azure DevOps
The above also relates to various accounts or deployments (C2C, P2C, etc.).
GitProtect’s cross recovery – data migration with no headaches
The migration process is swift when both Bitbucket and GitLab accounts are added and authorized in the application.
To perform migration:
1. Choose your Bitbucket backup.
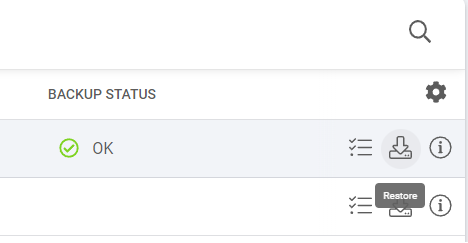
2. Click the Restore button (right side of the screen).

3. Select GitLab destination by clicking on the Restore to button.
That’s all you need to do. The migrated project is in your Git hosting service (GitLab) and the GitProtect window.

Key takeaway
The Bitbucket to GitLab migration process is undoubtedly a strategic move to leverage the latter’s DevOps capabilities. Its success hinges on pre-migration planning. It should include assessing the Bitbucket environment (repos, users, CI/CD) and defining the target GitLab structure.
Moving repositories from BitBucket to GitLab is not the most complicated IT and business venture. Yet, it still demands focusing on details and testing. That’s because GitLab lacks a mechanism supporting direct data transfer from an Atlassian Git-based solution.
While manual migration can be troublesome, tools like GitProtect.io offer a streamlined, automated, and far more reliable alternative for a smoother transition.
[FREE TRIAL] Ensure compliant DevOps backup and recovery with a 14-day trial🚀
[CUSTOM DEMO] Let’s talk on how backup & DR software for DevOps can make your migration process smooth and secure