
Disaster Recovery: Bitbucket Ecosystem – What Are The Best Scenarios & Use Cases To Build Uninterrupted Workflow
A Disaster Recovery plan has proven to become one of the most effective and efficient ways for Bitbucket data to be available after a disaster strikes. CTOs, CISOs, and Security Leaders consider the Recovery Point Objective (RPO) and the Recovery Time Objective (RTO) when they build their security plans to guarantee their Bitbucket environment has no single point of failure. And it’s reasonable if we look at the number of threats service providers face. Thus, more and more Atlassian customers have started to think about their backup as part of their Disaster Recovery strategy.
In this blog post let’s focus on why Disaster Recovery and other restore options are valuable, what place backup plays in a company’s recoverability, how to plan your Disaster Recovery strategy, and what threats the companies can face today.
What risks threaten your Bitbucket repositories and metadata?
There are a lot of threats that your Bitbucket repositories and metadata can face. Here you can see the most common ones:
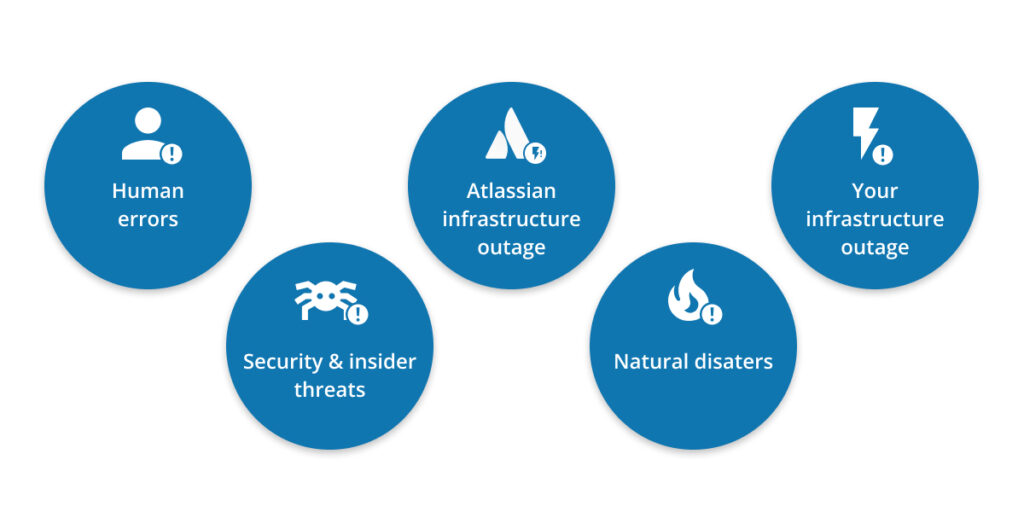
If you want to find out more about disaster events Atlassian faced in 2022, don’t miss our blog post 2022 In A Nutshell: Atlassian Outages And Vulnerabilities.
How to build an ideal Bitbucket Disaster Recovery Strategy?
When it comes to building a reliable Bitbucket Disaster Recovery strategy, backup is one of the key elements. Though, there are other aspects you should consider. Let’s go through them one by one.
Aspect # 1 – Identify sensitive data
It’s important for the company to identify the most critical data in their organization. It can include active and essential Bitbucket repositories and metadata (such metadata as issues, pull requests can matter a lot in case you lose them!). As soon as the company figures it out, it will be able to apply more careful security measures to the identified critical data, the required frequency of Bitbucket backups, and the access controls (who should be granted access to the original copy and its backups).
Aspect # 2 – Identify your RPO
RPO (Recovery Point Objective) is a crucial metric that determines the interval between the backup copies being done and the amount of data the organization can afford to lose between those backup copies.
To estimate and calculate this metric, you should identify all the sources that are critical for your organization, and then analyze how much data you may lose while keeping all the operation processes in your company continuous. As an example, let’s look at two absolutely different situations:
Situation 1: You are a fintech, healthcare, or government institution (and we know that they are the most targeted ones by cybercriminals!) and you can tolerate the loss of data produced in only 2 minutes. It means that the company’s RPO is 2 minutes. Thus, the company needs to have frequent Bitbucket backups to withstand the disaster.
Situation 2: You work in the automotive industry and you understand that if you lose the amount of data generated during 7 hours (almost a working day), it won’t be critical for your company. You can easily put up with that loss without interrupting your working process. In this case, your RPO is 7 hours and it allows you to make backup copies two times a day or even once a day (depending on the working hours).
Aspect # 3 – Identify your RTO
RTO (Recovery Time Objective) is another critical metric, yet it refers to the maximum amount of time the organization can tolerate its downtime after the event of failure. In other words, it is the set target time when the company has to recover all its IT and business operations.
To understand it better, let’s consider the following situation: your company sets the RPO to 3 hours. It means that the company has to recover its data and restore all the critical data within 3 hours after the catastrophe takes place. So, within those 3 hours, the company will be able to identify and mitigate the cause of downtime, and restore their business and IT processes successfully.
Thus, RTO aids in striking a balance between cost-effectiveness and the preparation process in the event of a catastrophe. When you set a low RTO, it means that your organization is prepared for an event of failure and has already developed a complete Disaster Recovery strategy that will guarantee fast data recoverability for your business continuity. On the contrary, when you set a high RTO you may spend less money on the tools that guarantee Disaster Recovery, but if the catastrophe takes place, you may end up spending much more time and money on data recovery.
If you want to be able to find a compromise and balance between the preparation process (for disaster) and its cost-effectiveness, you should understand that high-priority and crucial services need lower RTO to be restored in the first place. Moreover, they require more frequent backups and replication between different storage instances.
Aspect # 4 – Check your RTO and RPO regularly
You should thoroughly examine all your systems to identify your RTO right and ensure its effectiveness. What is more, it’s important to check your systems on a regular basis. Don’t even think of picking any number and putting it in your SLA.
What is the best way to check your RTO and RPO metrics? Constant reviewing. You should make it a rule to check your backup and DR plan on a regular basis. Only in this case, you will be able to notice which metrics suit your company better and how to adjust them effectively to your organization. So, what should you be able to do?
- control backup frequency
- use replication
- have a possibility to apply incremental Bitbucket backups
- be able to use granular recovery to grant access to your vital data from any point in time.
It’s worth assessing backup and recovery processes on a regular basis. And don’t forget to review backup logs and reports as well. Such an analysis will help you enhance your RTO and RPO parameters fast.
Aspect # 5 – Distribute Personnel Roles
Another important aspect is the roles and responsibilities your employees have in your DR plan. So, make sure that you’ve included the names, contact details, and obligations of every team member who is responsible for Disaster Recovery processes in your Disaster Recovery plan. Moreover, those people should have rigorous training to know how to declare a disaster, report it to management, and communicate with the media, customers, third-party vendors, manage the crisis, and recover from it effectively.
Aspect # 6 – Establish the Disaster Recovery Procedures
If you want to reduce and minimize the effects of the event of failure, you should make sure that you have established and documented the sequence of actions and plans on what to do in any disaster situation. Also, it’s important to keep in mind that the first few hours after the incidents are the most crucial. That’s why, your team must be certain of what to do to get back to normal operations as fast as possible.
Make sure that your CTO and Security Leaders have outlined all the essential actions that must be taken in the event of a catastrophe. It should include:
- data backup,
- data recovery,
- emergency communication protocols,
- activation of contingency plans.
Aspect # 7 – Develop a communication plan for the event of a disaster
If a disaster strikes, your company should know how to communicate and deliver information to stakeholders (if there are some), customers, media, compliance authorities, etc. For that reason, you should develop a comprehensive communication plan. Make sure that this plan contains:
- the list of appropriate communication channels,
- the appropriate communication tone of voice,
- message templates,
- an individual or a team who is in charge of organizing and distributing information in case of failure.
All those measures will help your company to keep your stakeholders and customers loyal and they will likely stay with your company during and after the crisis.
At the same, you should continuously assess and improve your company’s communication plan. To do that efficiently use feedback that you get from stakeholders and the experience you got from previous disaster events (if there have already been some).
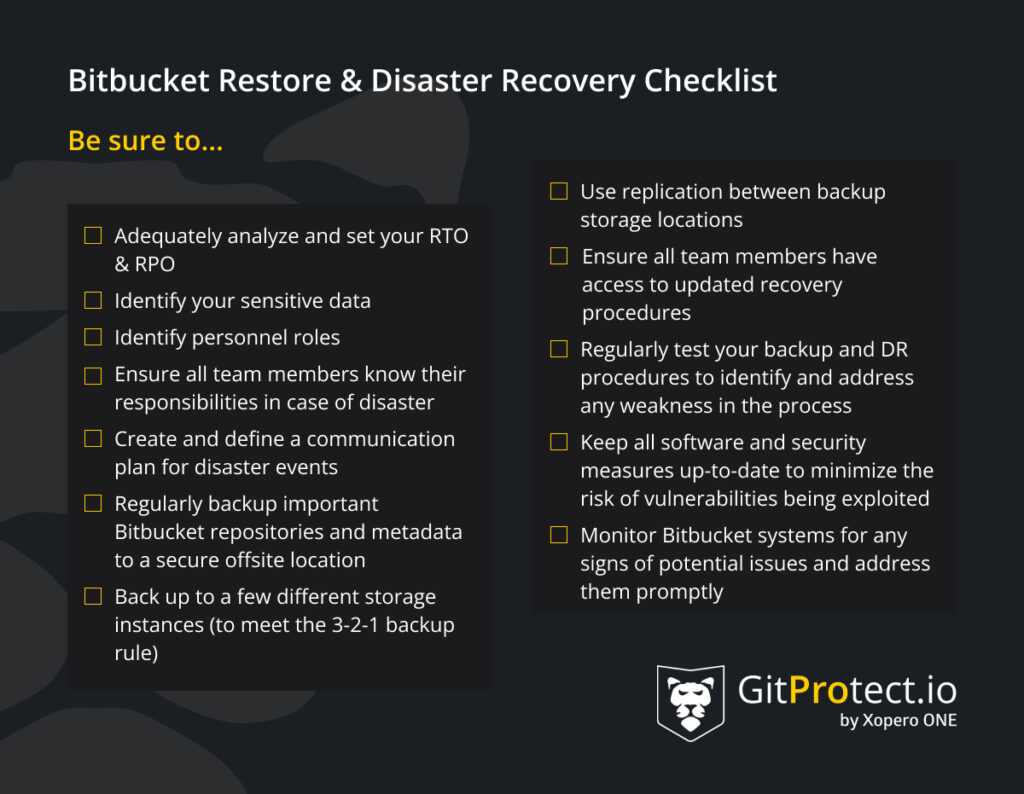
Aspect # 8 – Plan Bitbucket backup for your repositories and metadata
Disaster situations can be different, and your response to those events of failure will vary as well, yet there are some features that your backup system should definitely include to make your restore options and Disaster Recovery plan efficient. So, make sure that your backup permits you:
- imply long-term or even infinite retention which will not only allow you to recover your data from any point in time but also help to meet the Shared Responsibility Model
- meet the 3-2-1 backup rule when you make at least 3 copies to two independent storage instances, one of which is an offsite storage
- apply Grandfather-Father-Son (GFS) advanced rotation scheme, so that you can perform faster copies and ensure better storage capacity
- AES encryption in-flight and at rest, with your own encryption key
- ransomware protection, which is a must as a backup is the final line of your data protection
And we could make this list longer and longer to make your Disaster Recovery plan more effective.
Here catch a checklist on how to build your BitBucket Restore and Disaster Recovery strategy more efficiently:
Bitbucket restore options
We have already mentioned the challenges your DevOps team can face while coding. What is most important is how fast you will react and manage to recover your data to let your team continue coding without delay. So, let’s first figure out some Bitbucket restore definitions and then have a more precise look at Disaster Recovery scenarios and use cases.
Point-in-time restore strengthened by unlimited retention
Most backup vendors provide retention of 30 to 365 days by default. But what will you do if you notice some mistakes that have been made prior to that period? How is it possible to correct your code without rewriting the entire thing?
The solution is on the surface – retention and point-in-time restore. If your third-party backup app provides you with unlimited retention, you can easily restore your source code from the exact date and time you need your code to be back. For example, from 18 months prior.
Multiple repositories restore vs. granular restore
It’s worth remembering that your third-party backup software for your Bitbucket ecosystem should provide you with the option of fast granular recovery. Thus, your restoration process will take much less time, as you restore only the chosen repositories and some specific metadata you need. It’s used mostly in daily operations and as a result of i.e. unintentional deletion.
However, sometimes you may need to perform a multiple repository and metadata restore, so to say, restore a bulk of vital data at a time. Your Bitbucket backup provider should permit you to simply choose all the repos and metadata you need to restore for your workflow continuity, and after that let you restore them to your local machine, your Bitbucket on-premise or cloud account. In addition, there should be another option – crossover recovery to another git hosting service provider, e.g. from Bitbucket to GitHub or GitLab. All of that will make your Disaster Recovery plan fast and efficient.
Eliminate data loss risk and ensure business continuity with the first TRUE Disaster Recovery software for Bitbucket.
Bitbucket Disaster Recovery – Top 3 DR Scenarios & Use Cases
While you are in the process of comparing and choosing the most appropriate Bitbucket Disaster Recovery software for your repositories and metadata to meet your legal and Shared Responsibility requirements, make sure that your recovery solution is ready to cope with any possible data loss scenario. Moreover, you shouldn’t forget that Disaster Recovery planning is fundamental if you want to achieve high availability of systems and software tools in a few clicks. Let’s see how a third-party backup software should prepare you for every disaster scenario on the example of GitProtect.io:
Scenario # 1 – Bitbucket outage: an easy and efficient way to ensure your continuous workflow
To be able to continue coding safely fast after the Atlassian is down, you need to have a reliable Disaster Recovery plan. You should know exactly what you need to do. Moreover, it’s worth having a few plans up your sleeve. Let’s look at them in detail:
Plan #1
Instantly restore your entire Bitbucket ecosystem from the last copy, or only selected data as a point-in-time recovery to your local machine as .git.
Plan # 2
Use the option to recover the backup copy to your #Bitbucket local instance.
Plan # 3
Use the option of crossover recovery to another git hosting platform, e.g. from Bitbucket to GitLab or GitHub.
Scenario # 2 – Your infrastructure is down: the way to resolve it
We have already mentioned the 3-2-1 backup rule. And, actually, this backup standard is your guarantee to restore your data fast and efficiently for your DevOps team’s workflow continuity.
Let’s define this rule once again: at least 3 copies in 2 absolutely different storages, one of which should be in the cloud.
On this basis, you should be sure that your backup provider is a multi-stored system which makes it possible for your company to assign as many storages as you need – e.g. to keep your data in the cloud and in some absolutely another location as well, let’s say, on-premise. Even if you need an unlimited number of storage instances, your backup provider should grant it. What’s more, you should be free to use replication mode among all your storage instances.
Thus, following the 3-2-1 backup rule, you will be able to ensure Disaster Recovery of your Bitbucket metadata and repositories even if one of the storage is down.
Scenario #3 – Your backup infrastructure is down: get your backup copy and continue coding
Data protection is the first priority of a backup provider, that’s why the backup company should always be prepared for every outage scenario, moreover if it’s harming its own infrastructure.
In the ideal scenario, your backup software provider should have a reliable plan on how to withstand this challenge. For example, GitProtect.io will share with you the installer of the GitProtect.io on-premise application, if its environment is down, which is highly impossible.
With this on-premise installer, you will need to perform only 3 simple steps to continue coding without interruption:
- log in
- connect your storage where your copies are stored (so that you have access to all your backups)
- use data restore and Disaster Recovery options, like point-in-time restore or granular recovery of repos and selected metadata, restore to the same or new repo/Bitbucket account, restore to your local device, or cross-over recovery to another git hosting platform.
Conclusion
In this blog post, we have covered the most important aspects of building your Disaster Recovery plan to meet your needs, guarantee the stability of the coding process, and meet high-security standards if required.
Though, one thing you should keep in mind – always restore your backup copy of your repository as a new one. It is important from the security point of view, and it will help to track changes if you need them in the future.For more information about security tips on Bitbucket backup performance and Disaster Recovery, you can read our Bitbucket backup best practices blog post, which can guide you on how to plan and set up a backup that will work for your sake.