
How to Clone Using SSH in Git?
Each of us is aware of the importance of security in the IT world. On the other hand, it turns out that not everyone uses appropriate security measures, or sometimes we just don’t know how to do it. And this is what you will learn from this article – what is SSH, ssh command, github ssh key, public ssh key, and ssh directory, and more to use in our Git repositories. I also encourage you to read this article: How to clone a repository. It explains the principles of clone operation and further reading will be easier if you first understand the basics and the idea of cloning.
What is SSH?
First, we need to know what SSH is to understand why we can clone repositories with it. Secure SHell SSH is a communication protocol that enables a remote terminal connection, e.g. with a server or another computer. Importantly, such connections are encrypted. To establish such a connection, we need a pair of keys: private (saved on our computer’s hard drive) and public, shared with the service we want to connect to. We can quite easily establish such a connection for GitHub, GitLab, and Bitbucket. Also, the principle of operation is very similar on each of these portals, so I will focus only on GitHub ssh keys today as after that article you will be able to handle this process for other services on your own.
Before we try to do this, we first need to generate the aforementioned pair of keys. Unix systems have a built-in SSH module, while Windows, unfortunately, does not. In this case, we need to git config ssh key and install some external tool that will enable us to work with this protocol. I will show you how to do it using this project: gitforwindows.org. It allows you to use the terminal on Windows systems in the same way as in the Unix system family.
Generating a pair of keys
With a bash terminal, all you need to do now is type this command:ssh-keygen. Of course, we can provide parameters here, including the type of encryption algorithm, the name of the resulting file, etc., but we will not focus on this today. Let’s use the default options.
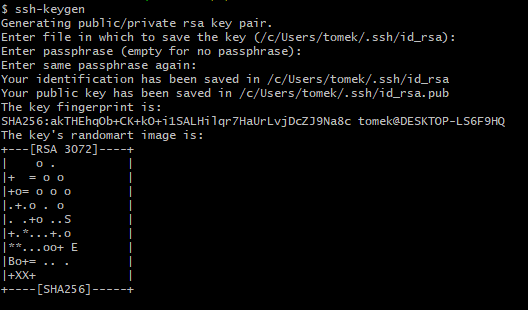
Leave both file name and passphrase blank. The default behavior should show something like the above, and in the given location we will find two files with our keys. The default names are id_rsa and id_rsa.pub.

Informing the service about our public key
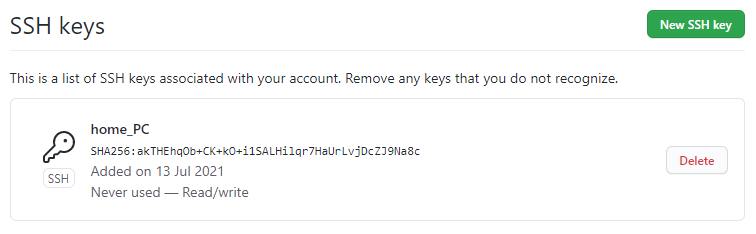
Since we already have the generated keys, we should now deliver one of them to the service we want to talk to using SSH. Let’s see how it looks on the example of GitHub. We need to enter our account settings and find the following option there:

Then find the SSH keys section and click the New SSH key button. Of course, our account can have multiple keys assigned to them, so it’s worth giving them meaningful names so that we know which device the key applies to. Remember to add a public key, not a private one! In my case, after adding the previously created key, this section looks like below:
After adding a new key, it’s worth to test your connection. In the bash terminal, just type the command: ssh -T [email protected]
An alert is possible here asking if you really want to connect to this host. It is worth verifying GitHub’s public key fingerprints at this point. In our case, everything is correct, so we approve. It is important that our GitHub login is included in the confirmation message. If it is not there, or we have the error “permission denied”, we should check that we did everything right. We can also delete these keys (locally and in GitHub), generate a new pair, and add again. Below is an example of the terminal view after all steps have been correctly completed:

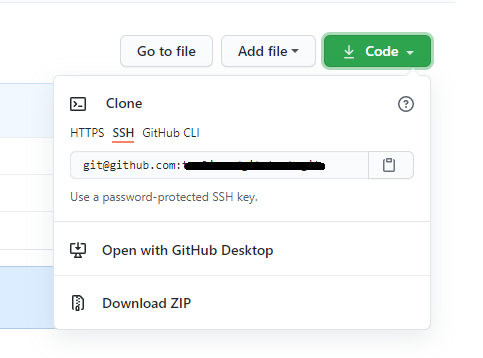
Now everything is ready and we can safely perform a git clone with ssh key. How to do it? There is no magic here anymore, the clone function requires the address from which we want to download the project. We just provide the appropriate address using SSH, not HTTPS. In both GitHub, GitLab, and Bitbucket, the clone with ssh process looks pretty much the same. For example, on GitHub, our repo address format is:
[email protected]:USER/REPO_NAME.git
git clone with ssh key – conclusion
As you can see, using SSH to clone repositories is not difficult. It is important to generate a pair of keys and keep the private key securely. For security reasons, SSH is a very good solution. In the case of private repositories, it allows us to limit the risk of data interception by unauthorized persons.

Another benefit is that SSH keys are unlikely to be changed often, and certainly not as often as passwords. For example, the company, for security reasons, forces the GitHub password to be changed once a month. If our local backups are connected via SSH, then we are not very interested in this password change and the connection to the remote repo will still be established as long as we have the correct key pair.
Despite the fact that setting up an SSH connection requires a bit more work from us than the usual clone via HTTPS, it is still worth doing whenever we care about the security and protection of data in our repository. Every admin, team leader, CTO, or anyone responsible for these matters in the company should make sure that each local copy of the Git repository is only cloned with SSH key.
Adding a new SSH Key to GitHub
- Generate keys:
start with generating the aforementioned pair of keys. To do so, open the bash terminal and type the ssh-keygen command. - Copy the aforementioned pair of keys:
check for two files with your keys: id_rsa and id_rsa.pub and copy them. - Login into GitHub account:
go to your GitHub account settings > SSH keys section and then click the New SSH key button. - Test your connection:
type in the bash terminal ssh -T [email protected] command. - Now you can safely perform a git clone with SSH key:
to do that provide the appropriate address using SSH, instead of HTTPS. - Congratulation,
the task was finished with success.
Frequently Asked Questions:
What is the difference between SSH and HTTPS in git?
The main difference between SSH and HTTPS in Git is the fact that SSH provides greater security, especially when managing multiple accounts. HTTPS uses SSL/TLS data encryption and not public key cryptography but is commonly used for its simplicity in configuration since it is built directly into the HTTP protocol. However, each action like git pull or push requires you to authenticate yourself.
SSH on the other hand, is a pair of cryptographic keys – a public and a private key, that guarantee your data cannot be altered or intercepted during the transfer. It is more complex to set up, therefore it is not as commonly used as HTTPS, but SSH provides greater security. Moreover, unlike HTTPS, you do not need to authenticate each action like signing a commit with SSH.
How to clone repo without SSH key?
To clone a repo without an SSH key you have two options. For private repos, you can use PATs (Personal Access Tokens) to clone your repository without an SSH key pair. As for public repos, you could just use HTTPS, which is less secure but allows you to clone the repo if you do not have an SSH key.
Which command is used to copy an SSH key?
The command which allows you to copy your SSH key is:
“ssh-copy-id -i ~/.ssh/mykey user@host”
Using this command, your created key can be installed as an authorized key on a server, leading to granted access to the server with no need for password-based authentication.
Can SSH keys be copied?
Yes, SSH keys can be copied. Simply copy the “~/.ssh” directory from the desired machine to your new one. Remember that this is sensitive data and it should be transferred using a secure method, for example, you can use a USB drive for it. If you do not plan on using the old machine, make sure to delete these private keys from there.
Before you go:
✍️ Subscribe to GitProtect DevSecOps X-Ray Newsletter and always stay up-to-date with the latest DevOps and security insights
👀 Discover what are the options to clone a Git repository and why it gives you more control over what you do
🔎 Check out what the difference between Git backup and Git clone and why the latter can’t substitute Git backup
📚 Find out how to clone using HTTPS in Git and what advantages it has
📅 Schedule a live custom demo and learn more about GitProtect backups for your DevOps data protection
📌 Or try GitProtect backups for your DevOps tools to eliminate data loss and ensure workflow continuity