GitLab Restore And Disaster Recovery – How To Eliminate Data Loss
The realias which the companies face in the IT industry today require every organization to think about different events of failure before they occur. Thus, they face the need to develop their cyber incident response plans: primarily, to have a reliable Restore and Disaster Recovery plan on the basis of their backup, and, secondary, to grant peace of mind to their DevOps and productivity teams.
In this blog post we will cover the basic features your GitLab backup should include to guarantee any time data accessibility, the threats your GitLab organization can face, and the best GitLab Disaster Recovery Scenarios and Use Cases to avoid catastrophic consequences in the event of failure.
Potential threats to your GitLab environment
Before we proceed to DR Scenarios and Use Cases and actually planning of the GitLab Disaster Recovery Strategy, let’s first figure out what can go wrong with our GitLab instance and if there is a real need to have a backup plan.
Among the biggest threats your GitLab infrastructure can face are:
- Human mistakes due to accidental or intentional behavior
- GitLab infrastructure outage
- Your infrastructure outage
- Cybersecurity threats, including threat actor’s activity, ransomware, or unauthorized access
Building GitLab Disaster Recovery strategy efficiently
We have already mentioned different situations that can occur in your GitLab environment. So, it’s time to think about what your ideal Disaster Recovery strategy for your GitLab instance should include
Now let’s look at some important aspects of building your GitLab DR strategy more precisely.
Identify your sensitive data
The first step in building your GitLab Disaster Recovery Strategy is to identify what data (active and important GitLab repositories and its metadata) is the most important for your company’s continuous workflow. It’s obvious that losing access to vital GitLab repositories and metadata can lead to prolonged downtime and loss of significantly important data.
That’s why, to build your DR strategy right, you need to understand which data should be protected carefully, how often you need to perform your backups, and who you should grant access to the original data and backup copies.
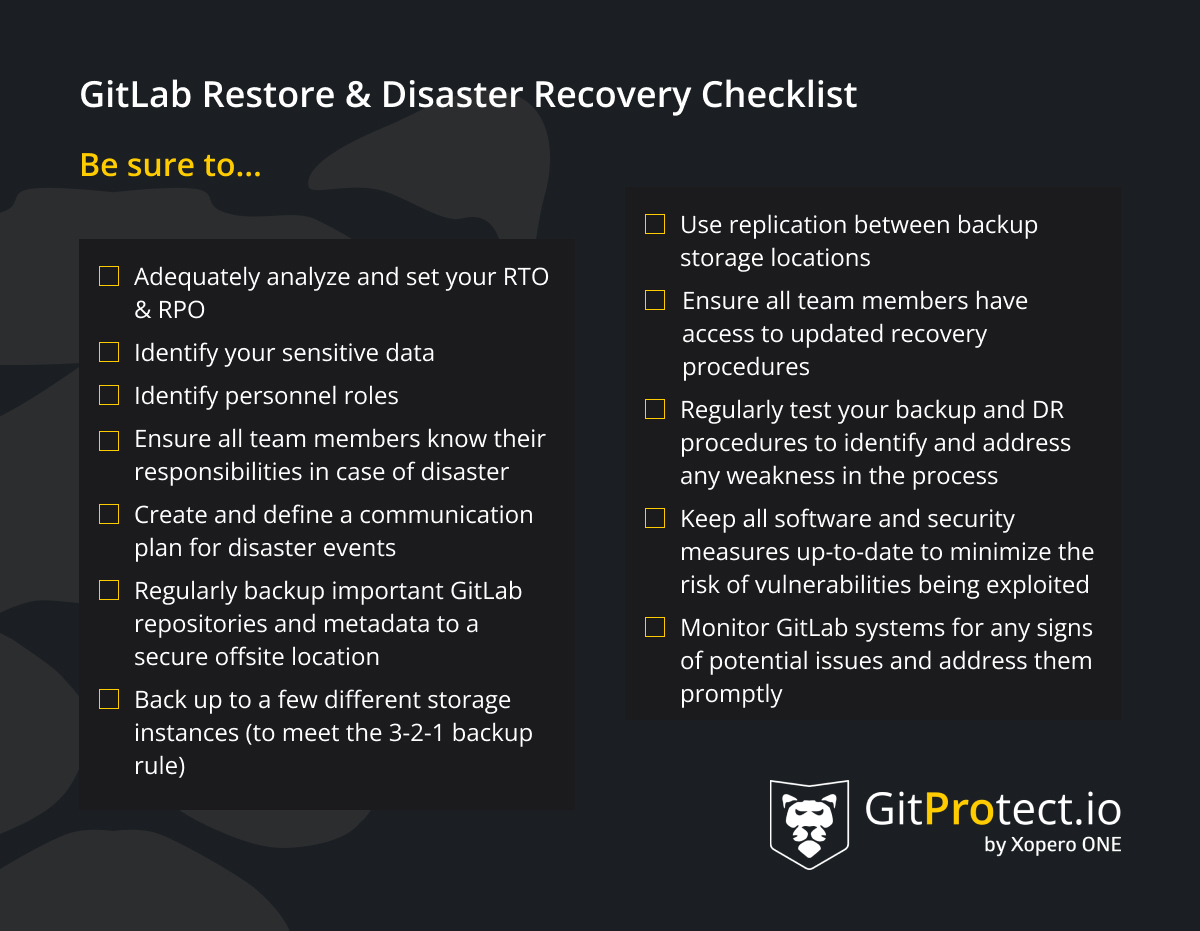
Adequately analyze and set your RTO
Recovery Time Objective (RTO) and Recovery Point Objective (RPO) are two crucial metrics to set while building your GitLab DR strategy.
RTO refers to the maximum amount of time the company can permit itself to be down after an event of failure takes place. It means that the company analyzes all its processes and sets target time for the recovery of its all business and IT operations. As an example, let’s look at an organization that set its RTO to 6 hours. In this case, this organization assumes that during the mentioned 6 hours, it will be able to get back to the normal working processes after failure occurs.
This metric helps the organization to find a balance between the preparation process to a disaster and cost efficiency. Usually, the lower the RTO you set, the better your company is prepared for an event of failure – you have developed a thorough backup and DR plan (frequent backups, replication between storages to meet 3-2-1 backup rule) , which enables you to restore the critical data quickly while ensuring business continuity. On the other hand, higher RTO could seem less expensive to maintain from the beginning, but when a disaster hits, your company might end up spending a lot more time and money on data recovery.
Analyze and adjust your RPO appropriately
When it comes to data backup and recovery processes, RPO is more than important. RPO refers to the time between the backup copies and the maximum quantity of data that your company may lose between those backups.
To gauge this metric, you should list all your vital data sources and determine how much information you may lose while still maintaining a continuous workflow. Depending on the field you are working on, your RPO will differ. For example, if the company can easily endure the loss of data produced during 10 hours in the event of catastrophe, then its RPO is 10 hours and the company can permit itself to back up its data once a day. Nevertheless, the company’s RPO is 10 minutes, so the company needs frequent backups.
Review RTO and RPO on a regular basis
You should always remember that your RTO and RPO must be realistic. Those metrics need to be measured and checked regularly. How? Just frequently assess your backup setup and DR plan to check if they meet your RTO and RPO metrics. Use replication, incremental backups, granular recovery, and granular backups for instant access to your vital data to optimize those metrics. An evaluation of backup and recovery procedures, as well as a review of backup logs and reports, should become a part of such a routine audit. Such an analysis will help you quickly enhance and adjust your RTO and RPO when needed.
Distribute personnel roles wisely
Everybody in your team should know who is responsible for a DR plan. That’s why you should make sure that it includes the names, contact details, and responsibilities of team members in charge of dealing with the Disaster Recovery processes. Those team members should be instructed thoroughly and know for sure who is responsible for:
- declaring about a disaster,
- reporting to management,
- liaising with press, customers, and third-party vendors,
- managing the consequences of the event of failure and recovering from it
- identifying the cause, seeking a solution and preventing measures for the future
Develop a plan for Disaster Recovery procedures
Make sure that you have developed and documented a set of measures and strategies to lessen the effects of the catastrophic incident. The first few hours are the most crucial, that’s why your team needs to react fast and be certain in their actions to get back to regular working processes as fast as possible.
Here are the steps CTOs and Security Leaders should outline as the most important to do in the event of failure:
- backup and recovery procedures
- emergency communication procedures
- activation and contingency plans.
Build a communication plan for disasters
It’s crucial for any business to have a thorough communication strategy in place for informing stakeholders and other possibly impacted parties, such as management, employees, the media, clients, and compliance authorities, in the vent of a crisis. This plan should contain message templates and the communication channels, a team or an individual who would be in charge of organizing and distributing information in the event of failure. All of that will help to keep shareholders and clients’ loyalty and they won’t resign your company during the toughest time for your organization.
At the same time, you should always assess and enhance your company’s communication strategy within the feedback you get from stakeholders and lessons learnt from prior catastrophic occurrences (if they took place).
Back up your GitLab for easy data recovery
In every risky situation you will need to act a little bit differently, yet proper backup of GitLab repositories and metadata is the basis. So, your GitLab backup solution should include:
- infinite data retention
- possibility to implement the 3-2-1 backup rule, so that you have at least 3 copies and your data stored in at least 2 diffrent location, one of which is offsite
- replication between storages, so that you always have replicated data between your storages
- versioning
- automation and scheduler
- ability to apply GFS (Grandfather-Father-Son)
- full, deffirential, and incremenal backups (to backup only the changes in your code)
- AES encryption in-flight and at rest with the option to make your own encryption key
- scalability
- ransomware protection
- easy monitoring, so that ou have full picture over backup and restore performance, e.g review failed objects and processes.
GitLab restore from backup – the most important options
We have already described different situations when you need to make fast decisions to save your work and be able to recover your data quickly for your team’s continuous coding. So, let’s look at some GitLab restore backup definitions before we proceed to DR scenarios and use cases.
Point-in-time restore due to unlimited retention
Point-in-time restore is one of the options that is vital for your data recovery process. Why? Everything comes to retention. Usually backup vendors allow you to restore only the latest copy or a copy from up to 365 days back.
For example, let’s imagine a situation when some member of your team has deleted an unused repository or a branch by a mistake – and it has not been noticed for a while. Then you need to get back to this project and find out… it’s gone forever. Well, not with backup and unlimited retention options. In this case, you can browse and check for copies and restore the lost data in minutes to let your team continue building the code with peace of mind. That’s all!
Granular restore guarantees instant data access
In daily operations you need to instantly restore a very specific repository and metadata, from some point-in-time to ensure velocity. And here comes fast granular recovery. With this option you don’t need to restore all the data in a bulk – you can browse copies and choose only the repositories and metadata you need to restore instantly, in seconds.
Eliminate data loss risk and ensure business continuity with the first TRUE Disaster Recovery software for GitLab.
All GitLab repository restore – Disaster Recovery made easy
However, you may have an absolutely different situation – the necessity of multiple repository restore. That’s the situation when you need to restore a bulk of vital data at the same time. Then, simply perform an entire GitLab recovery process and restore the copies to different locations – your local machine, GitLab on-premise/cloud account, or cross-over to another git repository platform, for example, from GitLab to Bitbucket or GitHub. It will help to make the DR plan fast and efficient.
GitLab Disaster Recovery – Scenarios and Use Cases
Each company starts looking for a backup and Disaster Recovery solution because of different reasons – compliance with legal, security and Shared Responsibility requirements, convenience of automated backups and monitoring, and we can enlarge the list more and more. However, the main reason that drives every Security Leader or CTO is recoverability – how to avoid data loss and guarantee that DevOps and operation teams can instantly continue their work after the event of failure.
That’s why while choosing the appropriate GitLab DR software for your repositories and metadata, you should find out what procedures your backup software provides for avoiding any data loss scenario. Let’s check GitProtect.io – the first true GitLab Disaster Recovery software, and its readiness to respond to any event of failure.
Scenario # 1 – GitLab downtime: which actions to take?
Longer or shorter (usually) downtimes in service access are inevitable for every cloud provider. What if they just touch GitLab and your assets and the whole IT team will stop because it will have nothing to work on? Then you need to perform GitLab Disaster Recovery and restore all data from the copy to ensure development and business continuity. That’s when you take advantage of the option to restore multiple repositories that we described above. So now let’s see where you can restore them.
Restore to your local machine
Recovery of your critical data to your local machine is the first option GitProtect.io offers its customers. It works simply: instantly restore your entire GitLab environment from the last copy or some chosen point in time to your local machine.
Restore to your GitLab Self-Managed instance
Another option is to recover all critical data to your GitLab Self-Managed instance. If a GitLab failure affects a limited number of accounts, unfortunately including yours, you can always set up a new GitLab account and restore data there within a few minutes for business continuity.
Cross-over recovery and application mobility
Using this option you can recover your GitLab data to another git hosting platform – GitHub or Bitbucket. Just a few clicks and your team can continue coding uninterruptedly.
Considering migration from GitLab to GitHub or Bitbucket? It’s a piece of cake! You can use cross-over recovery to migrate data in bulk from GitLab to GitHub or Bitbucket. There can be different reasons for the necessity of such a procedure, including licensing, fee issues, or some technical considerations – you know best.
Scenario # 2 – Your infrastructure’s outage: which steps to follow?
Backup is the foundation of the data restore process. It helps to prevent data loss and get to coding faster eliminating downtime. What is the best foundation of your backup? The 3-2-1 backup rule, under which you have at least 3 copies on no less than 2 different storage instances, one of which is in the cloud. Thus, in the situation where one of your storage is down, you can instantly restore the copy from another.
That is why, GitProtect.io is a multi-storage system which enables you to add as many storages as you need – up to unlimited. Moreover, you can set the replication plan to have independent copies on different storages (no matter what storage instance you have – on-premise, cloud, hybrid, or multi-cloud).
It is worth mentioning that regardless of the plan, you can always use included GitProtect Cloud Storage for free or use it for replication purposes so it ensures your GitLab Disaster Recovery even if one of your storages experiences an outage.
Scenario # 3 – Backup vendor infrastructure is down: what is the recovery option?
Every backup service provider should be prepared for its infrastructure downtime and other event of failure. Fortunately, there are no companies more aware of this than those operating in the cybersecurity industry. Therefore, make sure what the security process looks like for the backup solution you want to opt for.
GitLab DR option – Geo Disaster Recovery solution
GitLab developed its tool to help its users with Disaster Recovery in case of an event of failure. It’s still in Alpha and doesn’t provide an automated way to promote a Geo-replication. All the processes should be done manually if you’re granted root access to the GitLab instance. During this operation, your secondary Geo node is promoted to a primary node, so all you need is to work with primary and secondary sites. However, you should remember that you need to add new secondary nodes immediately to regain geographic redundancy. So, here are the steps:
- follow the planned failover docs as fast as possible if the secondary node replicates data from the primary Geo site – it will help to avoid missing data critical for your business processes.
- disable the primary node to get ready for the failover and avoid a split-brain situation. For that reason, you can stop and disable GitLab with SSH into the primary node using sudo gitlab-ctl stop command or, if you don’t have SSH access to the primary node, you will need to take your machine offline to prevent it from rebooting.
💡 Attention: To do so you may need any of the following: reconfiguring the load balancers, changing DNS records, stopping the virtual servers, revoking object storage permissions from the primary node, blocking traffic via the firewall, or disconnecting your machine
- promote your secondary node, including promoting by running on a single machine executing gitlab-ctl promote-to-primary-node or promoting with High Availability by executing sudo gitlab-rake geo:set_secondary_as_primary.
- update the primary domain’s DNS record if you need, as it will prevent the necessity to update or change Git remotes and API URLs.
- add a secondary Geo node to a promoted primary node if you need it.
- remove the secondary’s tracking database replication lag if you need it, as once the secondary site is promoted, you don’t need the data in the tracking database. For this reason, you can use sudo rm -rf /var/opt/gitlab/geo-postgresql command.
Takeaway
Your GitLab restore and Disaster Recovery opportunities are closely connected to the efficiency of your backups. That’s why, you should build your backup strategy in a way to be ready for any of the mentioned Disaster Recovery scenarios.
And, one more thing – when you face a restoration process of your GitLab environment, it’s always a good idea to restore the backup copy of your repository as a new one. First, it’s important from the security point of view. Then, it permits you to track changes, and if it’s needed, you can use it for some future references. If you want to learn more about GitLab backup performance, restore and Disaster Recovery, or GitLab Security tips, you can check our GitLab backup best practices article.