Migrate GitLab to GitHub? How to do it in an efficient and data-consistent way
This guide will help you migrate your GitLab projects to GitHub. During the process, you’ll preserve data integrity and minimize disruptions to your development (or any other) team.
We’ll cover repository migration, issue and pull request transfer, as well as CI/CD pipeline setup.
Reasons to migrate from GitLab to GitHub
While GitLab is a robust platform, many companies turn to GitHub. Considering the latter, they seek to leverage its extensive ecosystem, including native CI/CD with GitHub Actions.
Integration with various dev tools (IDEs, cloud platforms, project management) and collaboration features like branch protection and detailed code review options are also crucial.
GitHub’s large developer community, providing extensive documentation with support resources and status as an industry standard, may:
- enhance project visibility
- attract contributors
- simplify recruitment.
The migration discussed can advance analytics and reporting features to track key metrics, from code quality and developer productivity to release cycles.
Such data can inform business decisions and drive continuous improvement.
All you need to migrate your data
Before migrating, it’s recommended to consider a few steps as an introduction to the process.
Current state assessment
Obviously, a detailed assessment of your GitLab environment is essential to ensure a comprehensive and successful migration to GitHub.
Inventory of repositories
Compile a complete list of repos in your GitLab environment. This includes gathering metadata about each repository, such as its size, contributors, and relationships.
- Automated listing
Use the GitLab API (or CLI) tools to generate a list of all repos in your group or the entire organization.
curl --header "PRIVATE-TOKEN: <your-token>" "https://gitlab.com/api/v4/groups/<group-id>/projects"Extract data points like repository names, IDs, sizes, forks, and contributor lists. Save the output in a structured format (e.g., JSON or CSV) for analysis and tracking.
- Large file identification
Identify repos containing large files or binaries that may require Git Large File Storage (LFS). You can use Git commands or scripts to locate large objects:
git lfs track "*.largefile"- Dependency analysis
Audit each repository for external dependencies, such as submodules or linked libraries. You should also document webhooks or third-party tools (integration points).
- Submodules
Identify and document them by checking the .gitmodules file in each repo:
git config --file .gitmodules --get-regexp path- Third-party integrations
Catalog webhooks, API connections, or external systems that rely on GitLab repositories. Make sure these are reconfigured post-migration.
- Library and package links
Audit dependencies listed in package.json, requirements.txt, or equivalent files to ensure compatibility with GitHub workflows.
CI/CD pipelines
Analyze existing GitLab CI/CD pipelines to identify potential migration challenges.
- Pipeline structure
Examine .gitlab-ci.yml files to list all stages, jobs, and scripts. For example:
stages:
	-build
	-test
	-deploy
build:
	script
-echo "Building the application"- Runners
Document the configuration and usage of shared or self-hosted GitLab runners. Determine if equivalent runners are available in GitHub Actions or if custom runners need to be provisioned.
- Environment variables
List all variables stored in GitLab under Settings -> CI/CD -> Variables. Plan to migrate sensitive data to GitHub’s secret management.
- Artifact storage
Identify and backup pipeline-generated artifacts stored in GitLab. Next, confirm GitHub workflows can reproduce or maintain these outputs.
Custom configurations
Here, a few document-specific configurations must be replicated or adapted in GitHub.
- Branch protection rules
List rules (restricted pushes, required reviews, status checks) – you can configure them in GitHub under Branch Protection Rules.
- Marge requests templates
Review and export GitLab merge request templates (usually in .gitlab/merge_request_templates). Convert these into GitHub pull request templates by placing them in .github/pull_request_template.md.
- Access control policies
Document GitLab user roles and permissions (e.g., Owner, Maintainer, Developer) and map them to GitHub’s roles (e.g., Admin, Write, Read).
Backup your data
In this step, create comprehensive backups of all relevant data to mitigate risks associated with data loss during migration. Of course, the core of your GitLab data is the repos themselves, plus mirrored history, branches, tags, and commits.
The command for mirrored backups
Clone each of your repos using the –mirror flag to clone all refs, tags, and remote settings are cloned without modification.
git clone --mirror <gitlab-repo-url>The cloned repositories should be stored in a secure location, such as a shared drive, S3 bucket, or local backup server (locally cloned repository).
Validation
Verify the integrity of each mirrored repo by checking the commit histories and branch counts.
git log --all
git branch -a
Issue and wiki data
You should consider preserving GitLab issues, milestones, and wiki pages, as they often contain valuable project context.
Use the GitLab API to export issues in JSON format:
curl --header "PRIVATE-TOKEN: <your-token>" "https://gitlab.com/api/v4/projects/<project-id>/issues" -o issues.jsonRepeat it for milestones and labels as needed.
Next is exporting wiki content – cloning the GitLab wiki as a git repository.
git clone <gitlab-wiki-repo-url>After export, it should be stored in the exact secure location as the project repos.
Now it’s time for proper format and storage. Convert exported JSON files into Markdown or other formats for easier readability and long-term storage (if needed). Make sure you organize and tag these backups for quick access.
Pipeline artifacts
CI/CD pipelines often generate critical build or deployment artifacts you should retain.
Artifact download
Use the GitLab UI or API to download pipeline artifacts.
curl --header "PRIVATE-TOKEN: <your-token>" "https://gitlab.com/api/v4/projects/<project-id>/jobs/<job-id>/artifacts" -o artifacts.zipExternal storage
Document the storage paths and credentials if artifacts are stored in external systems, like S3 buckets or Google Cloud Storage. Back up the most critical artifacts to your designated backup location
Documentation
To facilitate rebuilding in GitHub Actions, create a detailed inventory of artifacts—including their purpose, location, and associated pipelines.
User data
When it comes to user data, you need it to replicate permissions and roles in GitHub.
Export user roles
List all project members and their roles using GitLab API:
curl --header "PRIVATE-TOKEN: <your-token>" "https://gitlab.com/api/v4/projects/<project-id>/members"Audit logs
Download GitLab audit logs to maintain a record of recent activity, especially if it is required for compliance. With audit logs, you can provide valuable insight into repository interactions and user access.
Permission mapping
Document user roles (Owner, Maintainer, Developer) and map them to GitHub’s permission model (Admin, Write, Read) to simplify migration.
Of course, after creating backups, it’s a good practice to validate their completeness. You can do it in three steps:
- Verify file integrity by checking file hashes or commit histories.
- Cross-check the inventory of repositories, issues, artifacts, and user data with your migration plan.
- Store backups securely and be sure they are accessible to authorized staff.
After such preparations, now is the time for the migration process.
Migration process
The first step is to prepare a new GitHub repo to serve as the destination for the GitLab directory (if you don’t have one). You can use the GitHub web UI to manually create it or automate it using the GitHub API (command).
Create unlimited private repositories on GitHub
curl -u "<github-username>:<personal-access-token>" \ -H "Accept: application/vnd.github.v3+json" \ https://api.github.com/user/repos \ -d '{"name": "<repository-name>", "private": true}'In this case, the command creates an empty repo with the correct permissions (optional if you plan to make unlimited private repositories).
Regarding manual setup via GitHub Web UI:
- go to your GitHub profile and select New Repository
- configure the repo name, description, and privacy settings.
Make sure the repo settings match your project’s requirements (e.g., private repositories for confidentiality).
Transfer the external Git repository (import repository from GitLab to GitHub)
Clone the existing GitLab repo(s) locally. Perform a bare clone to copy the entire project, including all branches and tags.
git clone --bare <external-clone-url>This way, you create a bare clone of the GitLab repo in your local directory. It contains all the repository’s metadata without the working directory.
Next, add the GitHub repo as a remote origin. Navigate to the cloned repository directory.
cd <temporary-local-repository>Now, set (add) the GitHub repository as the origin remote.
git remote add origin <github-repo-url>After, push all data (import repository) to GitHub. Use the –mirror flag to push all references, including branches, tags, and commit history, to the GitHub repo.
git push --mirror originWhen the push completes, navigate to the GitHub repository in your browser to verify the migration.
- Check the repo’s commit history to be sure all changes have been preserved.
- Verify that all branches and tags are present.
- Confirm the metadata – such as contributor information – has been accurately migrated.
Then, validate remote data consistency (locally):
git fetch origin
git log --all --oneline
It displays a concise summary of all commits across all branches. This way, you can spot all discrepancies.
It’s important to remember that the external-clone-url was correct and complete. If some branches or tags are missing, revisit the git push –mirror step.
Issue and wiki migration
You can initiate issue migration by exporting issues from GitLab using its API for extraction:
curl --header "PRIVATE-TOKEN: <your-token>" \ "https://gitlab.com/api/v4/projects/<project-id>/issues" -o issues.jsonThen, it’s time to import issues to GitHub. For this purpose, you can use third-party tools (e.g., GitHub Issue Importer) or write custom scripts leveraging the GitHub API to automate issue migration.
To migrate the wiki, clone the GitLab wiki repo (if enabled).
git clone <gitlab-wiki-repo-url>Push the wiki content to a dedicated GitHub repository or a wiki-enabled GitHub directory.
CI/CD pipeline migration
First, you should convert pipelines by extracting the .gitlab-ci.yml configuration file from GitLab. The goal is to translate its stages, jobs, and scripts into GitHub Actions workflows.
For example:
name: CI Pipeline
on: [push, pull_request]
jobs:
  build:
    runs-on: ubuntu-latest
    steps:
      - uses: actions/checkout@v3
      - name: Build
        run: echo "Building the application"
Next, migrate GitLab CI/CD variables to GitHub Secrets:
- navigate to Settings → Secrets and Variables → Actions in your GitHub repository
- add all necessary variables and credentials.
Finally, use GitHub-hosted runners or configure self-hosted runners equivalent to GitLabs counterparts.
Access and permissions
During the migration from GitLab to GitHub, the correct configuration of access and permissions is essential to maintain project integrity and ensure collaborators can continue their work without disruptions.
Adding users. The manual method using GitHub UI
To add users via the GitHub API:
- navigate to the repository in the GitHub Web UI
- go to Settings → Collaborators and Teams
- add individual users by their GitHub username or email and assign them appropriate access levels (Admin, Write, Read).
Adding users. Automated method via GitHub API
The GitHub API allows bulk addition of users and automated permission management. For example, adding a user with Write access:
curl -X PUT \
     -u "<github-username>:<personal-access-token>" \
     -H "Accept: application/vnd.github.v3+json" \
     https://api.github.com/repos/<owner>/<repo>/collaborators/<username> \
     -d '{"permission": "push"}'
Team management
For projects with multiple contributors or teams, managing access through GitHub Teams simplifies role assignment and ensures consistent permissions.
Team creation and permission assignment
To include your team into the system:
- navigate to your GitHub Organization -> Teams
- create a team and assign a descriptive name (e.g., QA Engineers)
- add team members
- link the team to one or more repos
- define team permissions.
Even if trivial, such an approach allows you to develop and easily modify access control for large groups with centralized management.
Map permissions
It’s worth noting that GitLab and GitHub provide different permission models. Mapping roles between platforms is convenient for a smooth transition.
1. Export a list of users and their roles from GitLab using the API:
curl --header "PRIVATE-TOKEN: <your-token>" \
      "https://gitlab.com/api/v4/projects/<project-id>/members"
2. Translate roles into GitHub’s permission levels.
3. Apply all permissions – manually or via the GitHub API.
For example, adding a user with Admin access:
curl -X PUT \
     -u "<github-username>:<personal-access-token>" \
     -H "Accept: application/vnd.github.v3+json" \
     https://api.github.com/repos/<owner>/<repo>/collaborators/<username> \
     -d '{"permission": "admin"}'
A far more convenient method with cross-over capabilities
Regarding a typical migration path between GitLab and GitHub, there is a more convenient, fast, and, above all, safe way of moving your repos to another platform.
GitProtect, a DevOps Backup and Disaster Recovery system, provides a cross-over solution. It allows you to back up the entire GitLab environment and restore it to another Git service provider.
Such a cross-over recovery is enabled between GitHub, Bitbucket, GitLab, and Azure DevOps – in any direction.

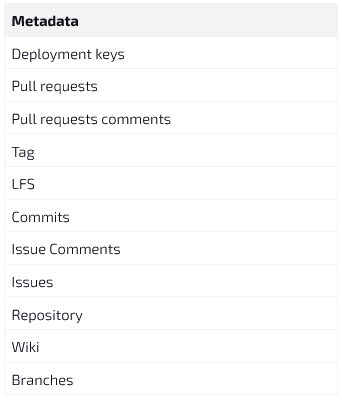
An example of resources, elements, and metadata allowed for migration
between GitLab and GitHub in GitProtect.io.
—————————————————————————————————————————————————————————————
Are you switching to a DevSecOps operation model? Remember to secure your code with the first professional GitHub, Bitbucket, GitLab, and Jira backup.
—————————————————————————————————————————————————————————————
The most significant benefit of GitProtect’s cross-over capabilities is the ability to add multiple organizations, different accounts, and hundreds or even thousands of repositories.
After preparing a GitLab backup in GitProtect, you can select a new or existing GitHub organization as a data recovery destination.
To transfer an existing Git repository to GitHub, you can create a lightweight clone of the repository and then push it to your GitHub project.
That’s all. GitLab to GitHub migration is complete, with all references copied to the imported repository.
Using the described feature makes the migration process trivial. It boils down to a few clicks on GitProtect’s UI. Each backup has a Restore feature placed on the right side of the panel.
After clicking it, you select the destination (git organization) to restore the GitLab backup. Of course, at the GitLab backup stage, you have control over the metadata the copy will contain. During the migration, you will be able to choose which metadata information to migrate.
A quick summary of GitLab to GitHub migration
By following the outlined steps and leveraging GitHub’s power, you can successfully migrate your projects from GitLab to GitHub. This migration empowers your team to harness GitHub’s extensive ecosystem, advanced features, and vibrant community.
Streamlining workflows, enhancing collaboration, and accelerating development processes allow you to unlock new possibilities for your projects and achieve success.
A part of the latter may be a trusted and comprehensive backup and disaster recovery system for automated DevOps backups – GitProtect.
It allows you to cross-restore and easily migrate your data between vendors (GitHub, GitLab, Azure DevOps, Bitbucket), accounts, and deployments (C2C, P2C, etc.).
[FREE TRIAL] Ensure compliant GitHub backup and recovery with a 14-day trial 🚀
[CUSTOM DEMO] Let’s talk about how backup & DR software for GitHub can help you mitigate the risks


