Jira Issue Security Schemes
Issue Security Schemes are one of the key features enabling your company to manage projects and tasks visibility. Very often, there are situations when the visibility of Issues within one Jira project should be limited to roles forming groups. To do it, just use the solution described in this article. It’s an additional feature that makes it easier to work in bigger teams and helps to avoid costly mistakes.
To effectively manage issue security, it’s important to understand how security levels determine which users can view specific issues and identify which issues should be visible to certain roles or groups.
The security level of individual Issues can be assigned at any time during the project’s existence by users with the necessary permissions. However, in some cases, it may be more practical to set the security level at the time of Issue creation. In this tutorial, you will learn step by step how to use Issue Security Schemes to make the processes supported by Jira more secure and efficient. You will learn how to manage who can view issues in your project.
What is the Jira Issue security scheme?
An issue security scheme in Jira allows for the limitation of visibility of certain issues based on project roles, user groups, or certain users. The scheme defines security levels, each of which determines which users can view issues assigned to that level. These levels don’t assign users directly but specify which groups or roles can access the issue.
To configure issue-level security, you generally need to hold administrative permissions, either as a Jira administrator or a project admin with sufficient rights. Once set, sub-tasks automatically inherit the security level of their parent issue and cannot override it.
When creating a new scheme, you can base it on an existing one – copy it, define new security levels, and link the scheme to selected projects. It is recommended that each scheme and its levels have clear, meaningful names and descriptions for future clarity and management.
It’s equally important to set a default security level, especially if visibility control is a priority. This ensures that all new issues automatically follow access restrictions based on the configured defaults—unless explicitly changed by users with permission to do so during issue creation or editing.
What are the levels in issue security schemes?
In Jira, it’s possible to limit the visibility of individual issues by assigning them to specific issue security levels. Each level outlines who is permitted to access a given issue – whether based on user groups, project roles, or named individuals.
These levels are organized under a broader configuration called a project issue security scheme, which must first be connected to the appropriate project before it takes effect.
After linking a security scheme to a project, the defined security levels become selectable for issues within that project. Assigning a level to an issue restricts visibility to users identified in that level’s configuration.
Note:
Sub-tasks are not exempt – they automatically adopt the security level of their parent issue.
To enforce access control by default, you can specify a default issue security level within the scheme. This ensures that every new issue, unless otherwise modified, is created with a baseline visibility scope already in place. You’ll find this option under issue security settings in the scheme’s configuration.
The first step – manage project permissions
Before creating level security, it is important to give access to an administrator who can manage those attributes. To do that, follow the steps below.
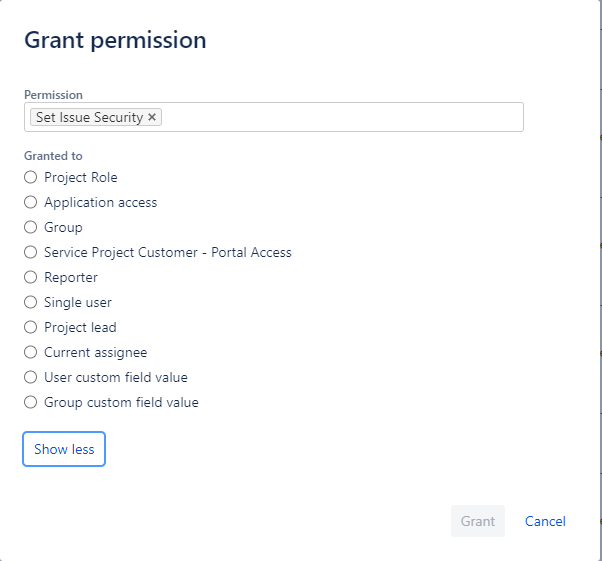
- Navigate to the Settings, then select Issue.
- Choose the permission scheme and click on the “Permissions” button.
- Scroll to “Set Issue Security”.
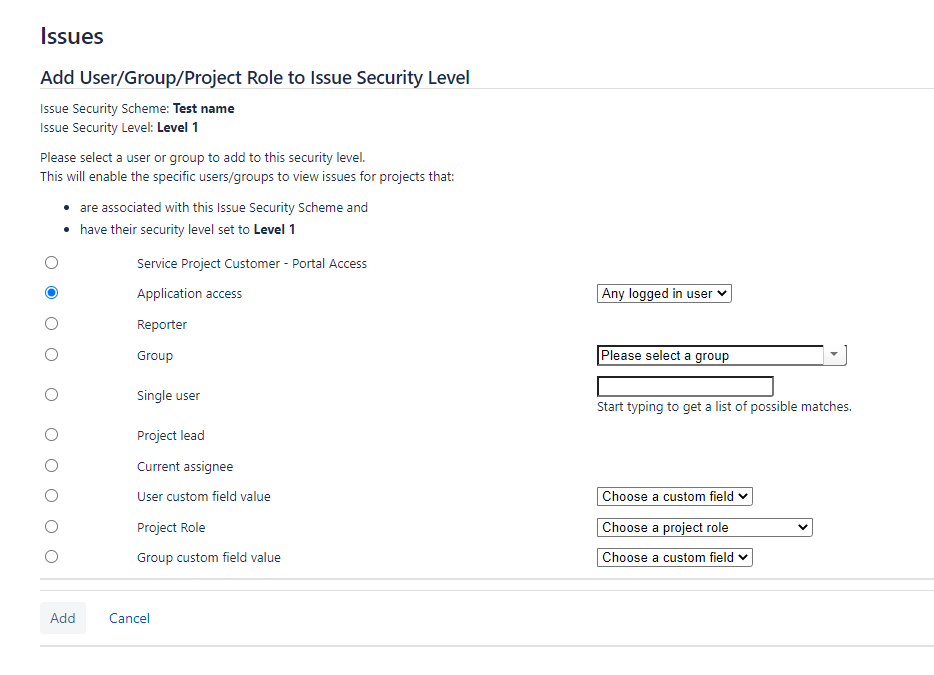
- Grant access to the chosen group, users, or specific project roles.
Once permissions are set, you can associate an issue security scheme with your project by linking it in the project settings. Editing these associations allows you to update access as project needs change.
How to set up Jira Issue Security Scheme?
To create an issue security scheme, follow the steps below.
- Open Settings and click on Issues.
- Scroll down to the “ISSUE ATTRIBUTES” section and open “Issue Security Schemes”.
- Click on the “Add issue security scheme” button. Note that certain elements, like the ‘Security Level’ field, cannot be added to a Create Screen but can be included on View and Edit screens.
- Fill in the name and the description. The latter is optional and will help you and admins on your instance in understanding why the Security level was created. Then add the scheme.
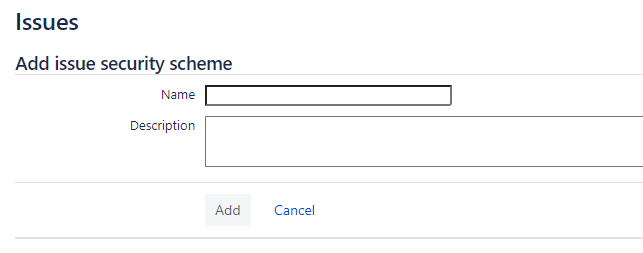
- A new element on the list will appear, which you can then edit and customize.

How to configure Jira security levels?
When configuring your issue security scheme, you can choose which screens display the security level field. The security level field cannot be added to the create screen, but it can be added to the view and edit screens. This allows users to view or change the security level of issues directly from the appropriate screens, helping you manage issue security more effectively. To configure security levels, follow the steps below.
- Go back to the list of issue security schemes and click “Security Levels” under the “Actions” column.
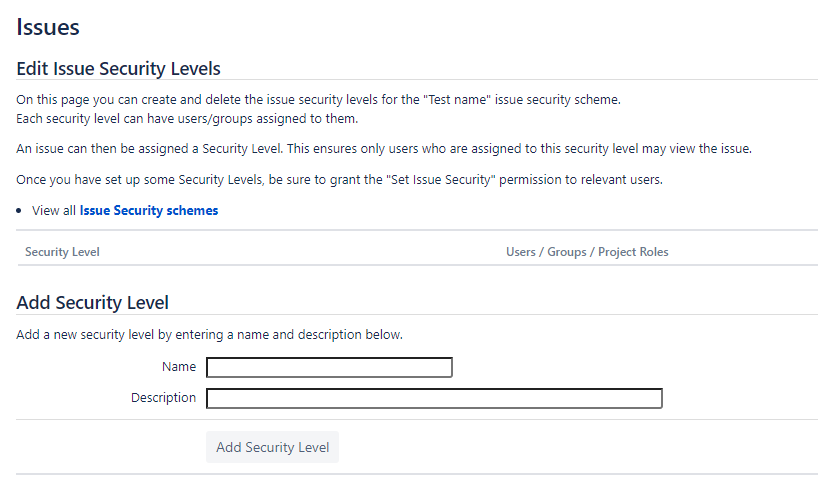
- Add security level names and descriptions.
- New levels will appear on the list.
- After creating levels, you can now configure them using the “Add” button in the “Actions” column.
- Set the level as you wish and click “Add”.
- On the list view of levels, you can also choose one of them to be the default issue security level by clicking on “Default” in the “Actions” column. Setting the default ensures that new issues are consistently protected with the appropriate security level.
Managing issue security
Effectively managing issue security in Jira is essential to ensure that sensitive data is only visible to the right people. Below is a practical guide to help you handle issue-level security with clarity and confidence:
1. Understand your security requirements
Before enabling issue security features, it’s essential to map out your internal data sensitivity policies. Identify what types of issues contain confidential or restricted information, and determine which users or project roles should have access to them.
2. Set up security levels
Go to the Issue Security Schemes page to create or modify your schemes. Add security levels with distinct, meaningful names that reflect their purpose (e.g., “Management Only” or “Internal QA”). This naming clarity helps maintain consistency across projects.
3. Assign users, roles, or groups
For each security level, specify project roles, groups, or individual users who should have visibility into issues using that level. When possible, favor project roles over static groups – they offer greater flexibility and reduce administrative overhead across company-managed projects.
4. Configure a default security level
Within your issue security scheme, you should also set the default issue security level. This level is automatically applied when new issues are created – unless changed manually – helping maintain baseline access control without user intervention.
5. Review periodically
Over time, access needs may evolve. Periodically audit who has visibility into each level. Make updates to the security levels, their members, or even the scheme association at the project level to ensure alignment with current organizational structure and access control policies.
By taking a deliberate approach to issue security, you protect critical data while keeping issue visibility aligned with your team structure and access expectations.
Best practices – improving the default security level(s)
When designing and maintaining your issue security schemes, following these best practices can make the difference between smooth collaboration and accidental data exposure:
- Keep schemes minimal and focused
Avoid overcomplicating your configurations with too many security levels or schemes. Stick to well-defined tiers that reflect real-world access needs. - Use clear labels
Give each security level and scheme a name and description that clearly identifies its intended audience. Avoid vague titles like “Level 1” and use meaningful names like “Executives Only” or “QA Team.” - Prefer roles over groups
Assigning permissions via project roles allows for easier updates within the project interface, instead of requiring changes in global group membership. This keeps control local and manageable. - Test your configuration regularly
Use test accounts or staging projects to verify that users see what they should – and nothing more. Also, check if the Set Issue Security permission is assigned correctly in the permission scheme. - Document everything
Maintain internal documentation describing each issue security scheme, its levels, the roles or groups included, and any relevant use cases. This makes onboarding and troubleshooting significantly easier.
Follow these patterns to prevent misconfiguration and ensure your issue visibility is as intentional and secure as your workflows demand..
Troubleshooting Common Issue Security Problems
Even a well-configured issue security scheme can cause confusion if specific settings are overlooked. Here are common problems and how to resolve them:
- Users can’t view an issue they should have access to
Check that the issue’s security level is set to one that includes the user (via group, project role, or direct user assignment). Verify the user has the Browse Projects permission in the associated permission scheme. Finally, confirm the issue’s project uses the correct security scheme and that the level is correctly applied. - Users can view issues they shouldn’t
Audit the security level and review which users, groups, or roles are assigned. Then, look for inherited roles (e.g., if Joe belongs to a group abc that has access, he’ll see the issue). Make sure users aren’t unintentionally included via overlapping group memberships or default roles like “Users.” - Security levels don’t seem to apply
Ensure the issue security scheme is correctly associated with the project via the Project Settings panel. Now, double-check that issue types using the scheme have the Security Level field on the relevant create or edit screens. Be sure the user creating or editing the issue has the Set Issue Security permission. - Error messages or unexpected behavior
Consult Jira’s application logs or audit log (if available) for related entries. Also, check for scheme misconfigurations, missing fields in screens, or disabled schemes. If needed, escalate to your Jira administrator or contact Atlassian support with relevant logs and use cases.
By identifying and resolving these common issues, you maintain functionality and trust in your Jira issue security scheme. Secure issue visibility isn’t just about permissions – it’s about safeguarding workflow integrity across every project, team, and user.
Why is Jira security important?
Many web developers and agile teams use Jira as their primary project management tool. The software has proven to be incredibly beneficial at all stages of project organization, including planning, tracking, and distribution.
Access to project settings is essential for assigning and managing issue security schemes, ensuring that sensitive issues are visible only to authorized users and data access aligns with project policies.
When team members and jira admins work to develop the finest and most viable software on the market, they exchange various data across the platform. All of those files are precious, and a single security failure could bring the entire system down.
Intellectual property is one of many organizations’ most valuable assets. To ensure it won’t be lost, use a reliable Jira backup solution, such as GitProtect. This easy-to-configure automated Jira Cloud backup will ensure your team’s project management is never disrupted.
Recover all of the data in your Jira instance, including projects, issues, roles, and many more. There’s no need for a separate restore program because GitProtect.io is an all-in-one backup and recovery solution.
Advanced Security Features
Jira offers several advanced features for issue security schemes, including:
- Custom fields
You can create custom fields to store additional information about issues, such as security classifications or clearance levels. This allows for more detailed and specific security settings. - Conditional logic
Use conditional logic to apply different security levels based on specific conditions, such as the issue type or priority. This adds flexibility and precision to your security configurations. - Integration with other Jira features
Issue security schemes can be integrated with other Jira features, such as workflows and screens, to provide a more comprehensive security solution. This ensures that security is maintained throughout the entire issue lifecycle. - Scripting: Utilize scripting to automate tasks related to issue security, such as setting security levels or sending notifications. Automation can save time and reduce the risk of human error.
These advanced features can significantly enhance the functionality and effectiveness of your issue security schemes, providing a robust security framework for your projects..
Optimizing Issue Security Schemes for Your Organization
To optimize your issue security schemes for your organization, consider the following:
- Align with your organization’s security policies
Ensure that your issue security schemes align with your organization’s security policies and procedures. This alignment helps maintain consistency and compliance. - Use a tiered approach
Implement a tiered approach to issue security, with multiple security levels and schemes to provide a more granular level of control. This allows for more precise management of access and visibility. - Involve stakeholders
Engage stakeholders from across the organization in the development and review of issue security schemes to ensure that they meet the needs of all users. Collaboration ensures that the schemes are practical and effective. - Monitor and review
Monitor and review your issue security schemes regularly to ensure that they are working effectively and efficiently, and make changes as needed. Continuous improvement helps maintain the relevance and effectiveness of your security measures.
By optimizing your issue security schemes, you can create a secure and efficient environment that supports your organization’s project management needs.
The article was originally published on May 22nd, 2022
[FREE TRIAL] Ensure compliant Jira backup and recovery with a 14-day trial 🚀
[CUSTOM DEMO] Let’s talk about how backup & DR software for Jira can help you mitigate the risks