How to set up GitProtect.io, create a first backup plan to start protecting your repositories and metadata
Dive into reading the article and find out how easy it is to create your GitProtect account and start protecting your critical DevOps data. Test a backup software during a 14-day trial period.
The world of cybersecurity is developing fast, and, unfortunately, the threats of losing your data are enlarging with every second. What to say about protecting the most valuable and crucial things – your repository and metadata? In this situation, it doesn’t matter what camp you belong to, GitLab, GitHub, or Bitbucket. The most essential is how to protect your source code and all the related metadata. And, actually, it is what we are going to speak about in this article.
Let’s get started – set up your account
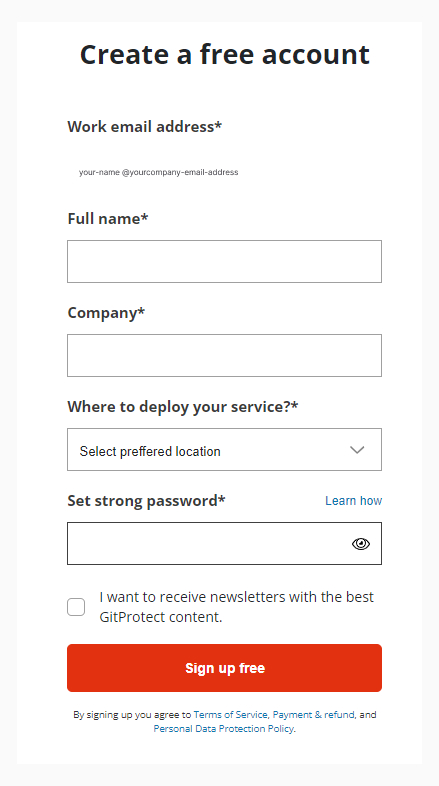
So, first let’s speak about how to set up your GitProtect account, which is probably the easiest thing you have ever done. For the first step, you will need to sign up by providing your email address or using single-sign-on (SSO) and utilizing your Google, GitHub, GitLab, Atlassian, or Microsoft account.

If you choose the first option with an email address, you will be asked to fill in some information, including your full name, name of your organization, region of deployment – Europe, United States, or Australia, and set a strong password. Remember that your password should include at least 9 characters among which there should be numbers, lowercase, and uppercase letters, and special characters like #$&*% – a bit comprehensive but security first. Remember to be abstract, and create a unique password. Another good idea is to save your password in a free password manager, thus you won’t need to remember it, repeat it, or write it somewhere down, so that one day you may lose it.
That’s it! Welcome to the world of the most professional and the most advanced DevOps backup!
Backup plan – set it up without worries
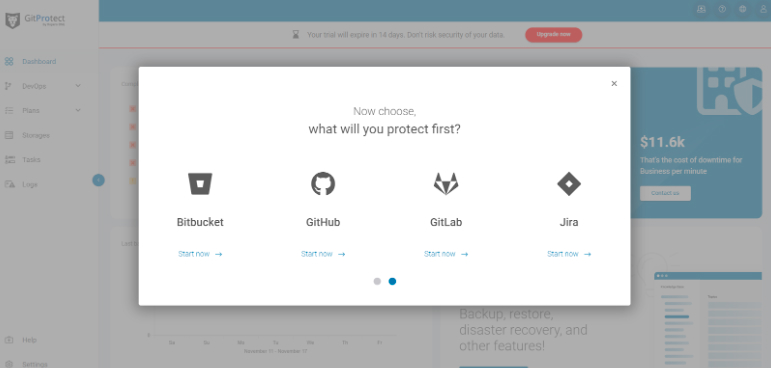
After your successful registration, you will need to connect your GitProtect account to your Git hosting account, whether it is GitHub, GitLab, Bitbucket, or Jira. All you need is to choose your git repository hosting provider and sign up with it. Now you are linked, and ready to create your first backup plan.
When we speak about plan creation it is so easy that even a child can do it. All you need is a good Internet connection, then your intuition will do all the job. But, before starting to create your plan, answer the questions like: “why do I need this backup plan?”, “what level of security do I want?” From the first side, it may seem easy but when you begin setting up your plan it is better to know your expectations to create a really useful plan. Though don’t worry, you can create as many plans as you need.
Predefined backup plan
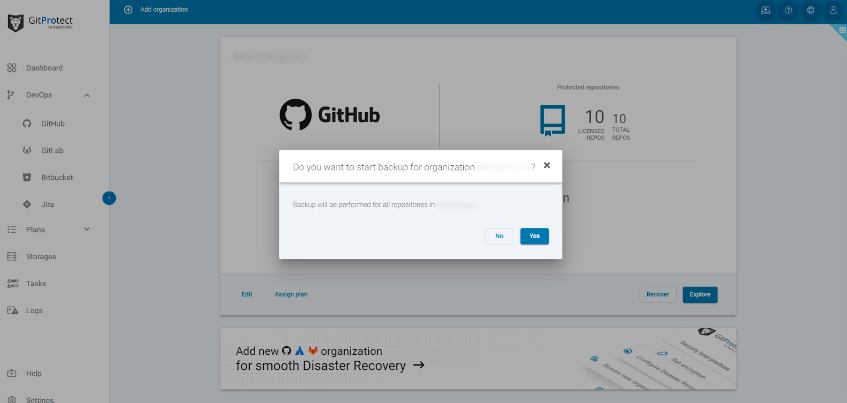
Once you connect your version control software, you can just confirm a predefined backup plan that will appear automatically in the dashboard. By default, it will start protecting all your repositories and metadata once a day and store your copies on included free unlimited cloud storage GitProtect provides. You will have the main options set up as well (3 months retention, data compression, task balancing, and error handling) but you can change all of them anytime – even when confirming the plan. Now all you need to do to automatically protect your entire account data is to confirm the plan by clicking the “Run now” button. That’s it – your first backup plan is up and running.
Not sure? Don’t worry, you will get daily email notifications with all statuses.
If you don’t want to set a plan right away, no problem, predefined plans are always visible and available in the panel – in the list of the plans so you can use them anytime.
Using predefined backup plans you can enable:
- Git Protection – this backup plan will protect all the metadata, but you can choose all or selected repositories.
- Jira Protection – this backup plan will protect the whole Jira account.
Custom Backup Plan Settings
It’s obvious that a predefined backup plan might not meet all of your requirements and you will want to create your own to have full control over the backup schedule, retention (up to unlimited), encryption, compression, and more. Moreover, you may want to store copies on your own storage, which obviously you can assign (local directory, SMB, NFS, or any S3 compatible cloud) if your GitProtect plan allows you to do so.
To start your first backup plan, open the bookmark with the title “Plans” under the GitProtect logo and then click the “Add plan” button in the upper left corner of the panel, to see the setup options. Now, let’s proceed to the backup plan title and other usual but crucial backup settings. So, you need to specify your plan with a name that will be clear for you and you can easily find it even if you have a hundred of such plans.
Now let’s choose a backup plan type – decide whether you want to protect GitHub, GitLab, or Bitbucket repositories and metadata, Jira or GitLab groups.
Let’s stay with git. The following stage is to choose repositories that you want to protect. It’s up to you to decide how many repositories to include in your plan – you can settle a plan for one separate repository or you can include a few or all repositories into your plan. Don’t forget to include the data you want to protect. There can be issues, wikis, hooks, etc. Depending on the repository, whether it is GitHub, GitLab, or Bitbucket, the metadata may differ. You can see all the metadata you can back up with GitProtect if you at least peer into our FAQ section.
After you have chosen the metadata you need to protect, you can choose the storage you want to back up your data to. We offer you our Unlimited Cloud Storage, but you can bring your own one compatible with S3 or on-prem, as well. So, choose the storage, and then you can jump to the next section to automate your backup using the scheduler.
How to set up your Scheduler?
Here it is important to determine the schedule you would like your backup copy to be performed. There are four options: Basic, Custom, Forever Incremental, and Grandfather-Father-Son (GFS), and depending on which one you choose, your copies will rotate and perform in a slightly different way. At this stage, you can still freely adjust the settings of a specific scheduler – the type and execution time of individual copies (full, incremental, and differential).
In each of them, you are offered to choose on which basis your backup will be performed (monthly, weekly, daily, or hourly). Moreover, you can schedule the exact day of the month, or week when you are interested in your backup to be executed.
What is more, here we have a very useful function – Backup Window. This feature permits you to define a preferable time period when your backup will be done and the hours when your backup won’t be executed. For example, you want to reduce throttling during work hours, so that your DevOps team has stable and secure Internet access. Your team works peacefully and your backup is done automatically when your team relaxes and gets new powers to write perfect strings of code the next day.

And, finally, the last issue you need to decide on is retention. First and foremost, you have the option to set up even infinite retention (not all backup vendors offer such a possibility!) Why is retention such a principal feature? It can be due to legal, compliance, and your internal organization requirements for storing your critical data and copies. For example, if an organization is planning to go through a security audit, like SOC 2 or ISO 27001, retention can play an important role as it guarantees accessibility of your data from any point in time.
Moreover, we shouldn’t forget about the Shared Responsibility Model which all SaaS providers follow. Thus, a SaaS provider is responsible for the smooth running of its infrastructure, and a user has to protect its own data. Having unlimited retention, the company can stay assured that it can run the copy it needs from any specific moment.
GitProtect.io provides organizations with 3 possible retention rules:
- by time – how long an organization needs to keep its copies;
- by number of copies – how many copies an organization needs to keep;
- unlimited retention – when an organization can keep its copies forever.
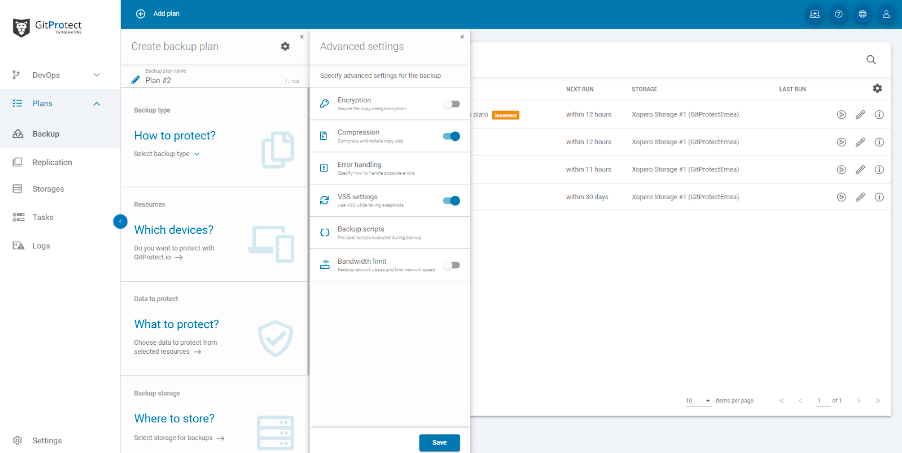
So, with GitProtect.io you can set a usual plan based on the most common desires or a custom one, using advanced settings. If you want to use such a possibility you need to click the setting sign in the top right corner of your Create backup plan window.
Why use advanced settings?
Everything we are aimed at is your best data protection and your convenience as well. Thus, for the most demanding plans you can use different specified settings like encryption, compression, error handling, backup scripts, or bandwidth limit. Now let’s stop at each of the points more thoroughly to see what advantages they open to you.
Data encryption
You have the possibility to encrypt your data with three different levels of encryption, which are low (AES CBC 128) – the fastest one, which requires low latency and high throughput, normal (AES CBC 192) – the most optimal one as it gives the balance between speed and level of security, and high (AES CBC 256) – the most secure one, as it uses the 256-bit key for data protection used by most federal companies and considered unbreakable but at the same time it makes this level a little bit slowlier than the rest one. Still, not that significant to compromise on security.
Also, you can use your own encryption key – you can generate a key within the signs, letters, and numbers you provide or you can generate your own encryption key (which is going to be the strongest protection, as nobody but you will know the characters).
Compression
Remember, you have a choice, as always. It is possible to use LZ4 or ZStandard compression. What is the difference? LZ4 is a lossless data compression algorithm that is mostly focused on the speed of compression and decompression, while ZStandard is a fast lossless compression algorithm that has highly performant reference implementation and versatility.
No matter what compression algorithm you choose, you will need to select the level of compression. By default, there is a Medium one – which has a balance between fast backup and backup size. However, if speed is your priority, you can choose the Normal level of compression, but (pay attention!) it will take more space in your storage. On the other hand, if you want to save space in your storage, it is better to set a High level of compression, though it will take a little bit longer to perform your backup plan.
Error Handling
With this function, you can set the way your plan is behaving in case of failure. If you need, you can run the overdue backup tasks (if there are some), or what is crucial to set is the number of attempts to re-perform your backup after failure and the time interval within which they are going to be performed.
Backup scripts
Here you can select how your pre- or post-scripts are going to be executed while taking backup. And you have three options:
- Pre-backup script – which helps to perform the script before backup execution;
- Post-snapshot script – once the data snapshot is completed, this script is performed;
- Post-backup script – when your backup is finished, the script can be executed.
Bandwidth limit
Another feature you can apply to make your backup plan more advanced is bandwidth limit. It can be helpful in reducing the network usage and limiting the network speed.
Notifications
Monitoring is one of the keys to the successful management of your backups. With Gitprotect.io, organizations can set their notifications, including custom email notifications, Slack notifications, or Webhook notifications. Thus, you will get information on backup performance – finished tasks, tasks finished with warnings, failed tasks, canceled tasks, and tasks not started at hand. It permits organizations to always stay up to date without even logging in to the GitProtect management console.
Pro-Enterprise Tip 💡
The best practice for big, enterprise users is to create a dedicated GitHub user account that will be connected to GitHub backup software and responsible only for backup purposes (ie. [email protected]). It is due to two reasons – but security first. It means that this user should have access only to repositories it aims to protect. It also helps to bypass throttling – each GitHub user has his own pool of requests to the GitHub API – so every application associated with this account operates on the same number of requests. Thus, the separate user enables them to bypass these limits and perform backup smoothly without any queuing or delay.
If you manage a big organization and numerous repositories it is good to have several GitHub users dedicated to backup purposes within your GitHub account – when the first one exhausts the number of requests to the API, the next one is automatically attached, and so on. Then the backup of even the biggest GitHub environment performs uninterruptedly.
Role and permission management
And one more thing – you shouldn’t be the one who manages all those plans – you can entrust your smartest DevOps, security specialists, or admins to do it. GitProtect.io provides you with the full user, roles, and permissions management. The most trustworthy can even set the new plans and manage recovery and the least ones can just look at how your backup plan is being performed. You are the one who decides!
Now, all you need to do is to save your plan and run it. That’s it! Your first backup plan is done and it will be performed automatically according to your settings, and you can have peace of mind that all your repositories and metadata are safely and securely backed up.
It’s always better to see something once than to hear about it many – experience it for yourself.
[FREE TRIAL] Ensure compliant DevOps backup and recovery with a 14-day trial 🚀