Bitbucket To GitHub Migration: How To Migrate From Bitbucket To GitHub
Growing firms migrate between Git-based platforms to provide the capabilities they need. The goal is to secure repos while integrating them with various tools. It may sound trivial, yet repos and DevOps platforms are inherent to business growth and evolution.
A typical example may be moving repos from Bitbucket to GitHub. If so, let’s consider why and how you can migrate your repositories from Atlassian to a Microsoft-owned solution.
Why migrate from Bitbucket to GitHub?
It’s worth underlining that such a migration process is not about choosing a “better than other” platform. The core idea is to match the tool with the specific needs and expected features.
Businesses opting for robust private repositories and seamless integration with Atlassian tools will likely use Bitbucket. Bitbucket’s offer includes a competitive plan for smaller teams, supporting this choice.
GitHub will be the preferred tool for firms prioritizing extensive integrations, advanced automation, and a large community, including open-source development.
However, it’s not a secret that many experts have pointed out GitHub’s focus on source management. That translates into more confidence in GitHub’s long-term viability regarding version control.
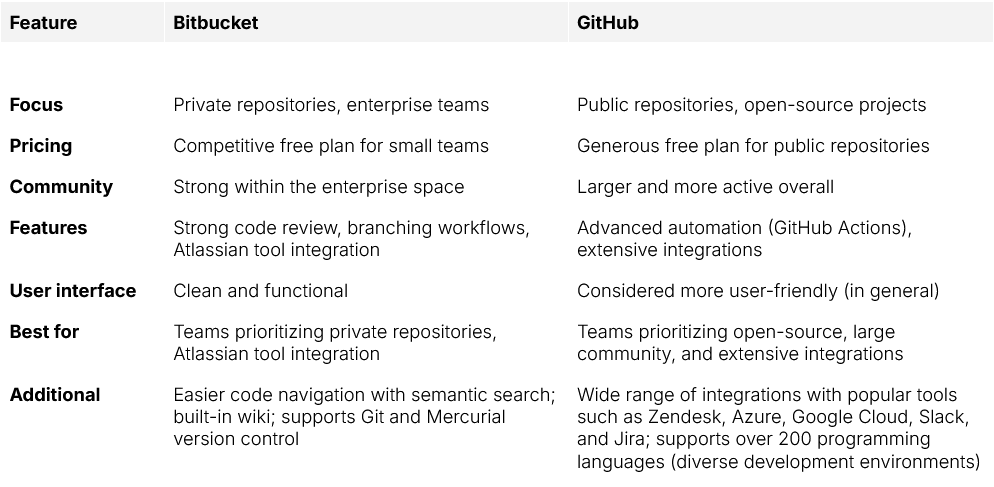
Basic Bitbucket vs. GitHub comparison.
📌 Check also our comparison guide of GitHub and Bitbucket: Git Battles Part 1: GitHub vs. Bitbucket – what to choose for your development team?
Before migrating: what to consider in the pre-migration stage
Just like in the case of every migration, it’s recommended that a comprehensive assessment be performed. Here are vital elements you should consider.

Repository inventory
It’s good to begin by cataloging all repos in your Bitbucket workspace. Note the repository:
- size
- activity level
- branch counts
- tag use
- contributions and any relevant metadata.
Such an inventory will help prioritize repositories and identify potential challenges with large or inactive repositories.
Check the dependencies
Analyze dependencies with each repo. That includes, among others:
- CI/CD pipelines
- webhooks
- integrations with third-party tools.
Next, document them and create a strategy for replicating or migrating them in GitHub. For instance, if Bitbucket Pipelines is used, plan the equivalent workflows in GitHub Actions.
Analyze the access control and permissions
Like the title above, map the existing access permissions from Bitbucket to GitHub. Also, evaluate:
- workspace-level access
- repository-level permissions
- individual or team access.
Of course, GitHub’s organization and team structures may require you to reconfigure access controls to match existing policies.
Preserve the needed history
Make sure the migration process retains all commit history, branches, and tags. That’s critical for compliance and auditability, as well as for maintaining the integrity of version control.
Verify that the complete history can be transferred without issues due to size or configuration limits for larger repositories.
View the compliance
Examine the legal and compliance rules which are applied to data stored in a repository. That includes checking for:
- proprietary information
- licensing constraints
- data residency considerations.
Seek approval from the legal or compliance teams to mitigate any potential legal or compliance risks during the migration.

Tools and methods for Bitbucket and GitHub migration
Several tools and methods are available to migrate your Bitbucket repositories to the GitHub platform. Let’s examine them.
GitHub’s Importer Tool
The GitHub Importer tool is designed to facilitate the migration of repos from other Git-based hosting services, specifically to GitHub.com. You can utilize it for straightforward repository migration.
To migrate with GitHub’s Importer:
- Log in to your GitHub and move to the repository creation site.
- Select the Import Repository option.
- Enter the Bitbucket repo URL and authenticate with your Bitbucket credentials.
- Choose the repos to import and initiate the process.
Although using the tool is very simple, there are significant limitations.
- The tool is suitable for repos under 2 GB in size. Working it around requires additional activities involving the console or splitting repos into smaller parts.
- More advanced configurations like webhooks, CI/CD pipelines, or granular permissions may not transfer.
- The tool requires manual reconfiguration of settings post-migration.
Git clone and push commands
For manual control over the migration process, you can utilize the git clone and git push commands:
git clone --mirror <bitbucket-repo-url>
cd <repo-name>.git
git remote add github <github-repo-url>
git push --mirror github
Such a method preserves all commit history, branches, and tags. It supports repos larger than 2 GB or those with specific customizations.
Nonetheless, using the above commands:
- requires manual handling of permissions, webhooks, and integrations
- may involve additional steps for repos with submodules or unique configurations.
The most common third-party tools supporting Bitbucket to GitHub repository migration
Naturally, you can migrate your Bitbucket directories to GitHub with the help of third-party solutions. Among them, the most recognized are:
- Bitbucket Cloud Migration Assistant
- GitHub CLI
- Git LFS Migrator.
Bitbucket Cloud Migration Assistant (BCMA)
The Bitbucket tool was designed specifically for the Bitbucket Cloud. The solution facilitates migration by directly transferring repositories, permissions, and metadata to GitHub. BCMA minimizes manual intervention while ensuring compatibility with GitHub’s features.
GitHub CLI
GitHub’s CLI provides scripting and automation capabilities for repository migrations. It’s the solution for organizations handling large-scale transfers or repetitive tasks. CLI allows for custom workflows and integration into broader automation pipelines.
Git LFS “Migrator”
The above is a command-line tool in Git Large File Storage (Git LFS). It was created to facilitate the conversion of large files (blobs) into Git LFS pointers and reverse. The tool ensures that all large file data is migrated correctly and linked to the repository.
What to do after you finish the migration process?
After you’ve finished moving your repositories from Bitbucket to GitHub, it’s time to check its correctness. You still need to:
- validate the process
- check configurations
- inform the team about changes
- manage your old repos.
Process validation
First, verify repository integrity. Inspect the migrated repos to confirm that all branches, tags, and commit history match the original state in Bitbucket. Review the git log command to check if the data is consistent. Also, compare repo views in GitHub.
To test CI/CD pipelines, rebuild the CI/CD workflows in GitHub Actions or CI tools. Execute the pipelines end-to-end to identify any misconfigurations or bugs that may have emerged during the migration.
Finally, you can check integrations. Validate that external tools, such as Slack notifications or Jira links, remain functional. Trigger repository events (e.g., commits, pull requests) and observe expected behavior.
Configurations’ update
Recreate webhooks by re-establishing connections to external systems – configure new ones (webhooks) in GitHub. For example, if your repo interacts with a monitoring system, update its URL to reflect the new GitHub repository.
Next, migrate pipeline definitions into GitHub Actions or adapt them for other CI/CD solutions to adjust build pipelines. Use GitHub-specific features like reusable workflows to streamline pipeline setup.
Now, you can configure repository settings. Implement best practices such as branch protection rules:
- requiring code reviews for pull requests
- enabling status checks before merges.
These configurations support collaboration and help maintain code quality.
Communicating changes
It’s vital to notify your team. Send detailed information about the migration to developers, stakeholders, and collaborators. Include new repo URLs, access instructions, as well as guidelines for updating local clones with commands like:
git remote set-url origin <new-github-repo-url>
You also should update the documentation. To reflect the migration, revise all relevant documentation, including:
- README files
- internal wiki pages
- project guides.
Old repositories management (depreciation)
Considering old directories, set Bitbucket repositories to “read-only” or archive mode to prevent further changes. This way, the old repos will remain accessible for reference without risking accidental updates.
Further, redirect all dependencies. To point to the new GitHub repos, update any external ones, such as:
- CI configurations
- package managers
- linked services.
If applicable, implement URL redirects or inform dependent teams of the changes.
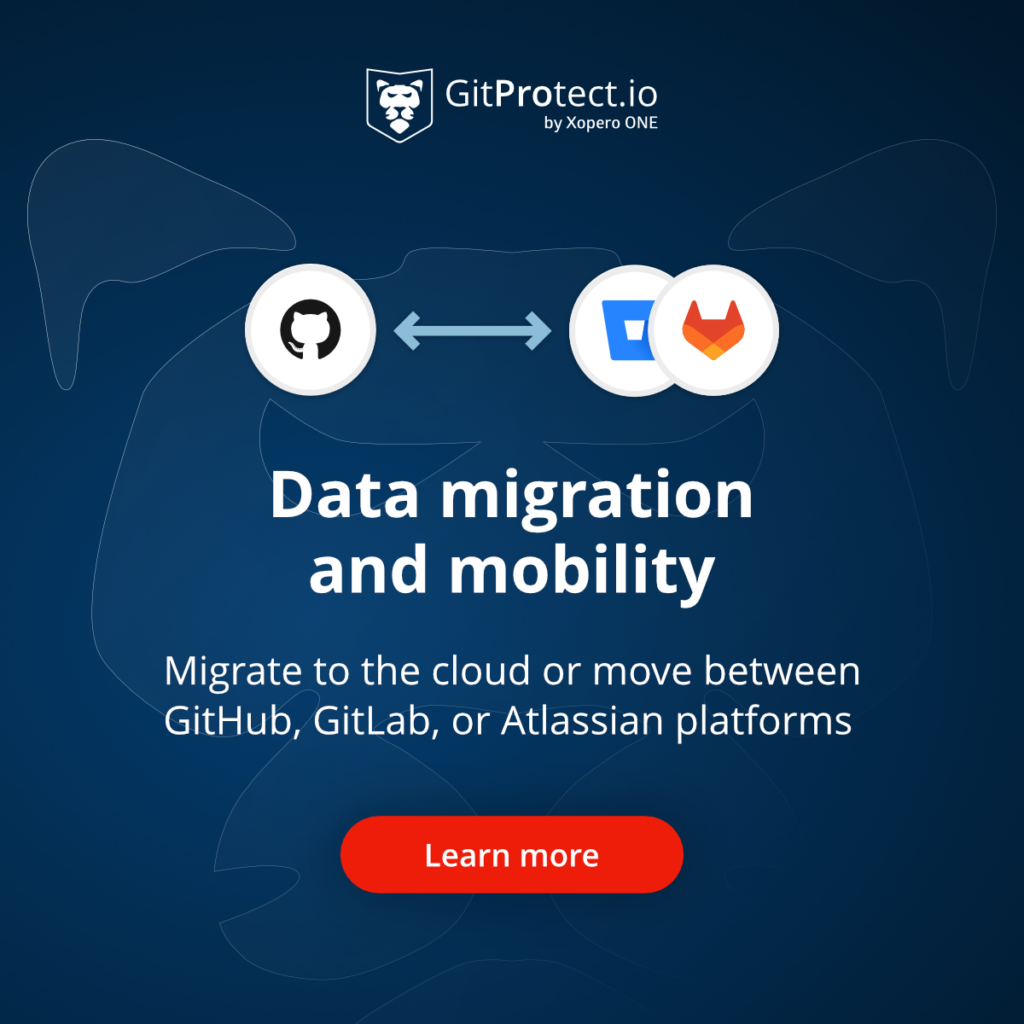
Cross-restore – the fastest way to migrate Bitbucket to GitHub
The fastest and most secure approach to migration is through GitProtect.io, which is a backup and disaster recovery (DR) solution for DevOps tools.
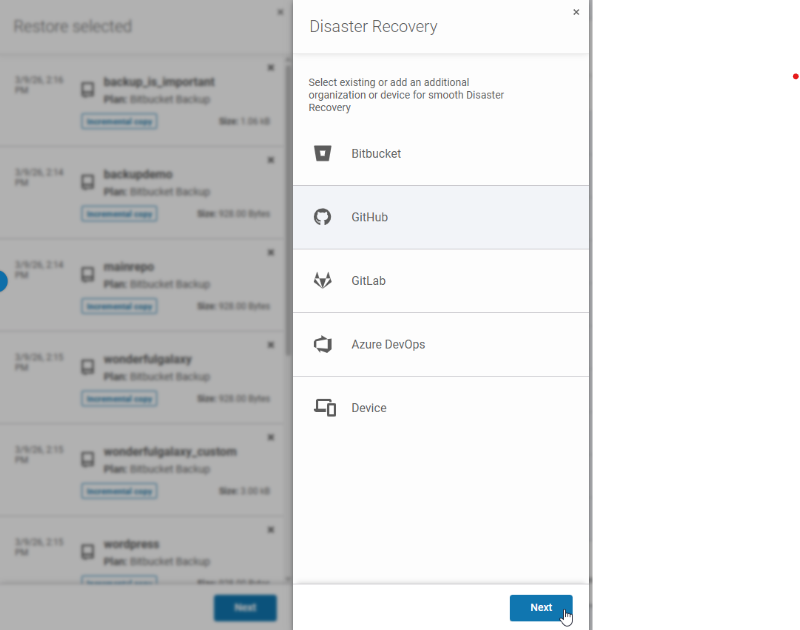
In fact, backup functionality should be inextricably linked with recovery options and adapted for seamless data migration. That is how GitProtect’s cross-recovery capabilities allow you to move your repositories safely between:
- GitHub
- GitLab
- Azure DevOps
- Bitbucket
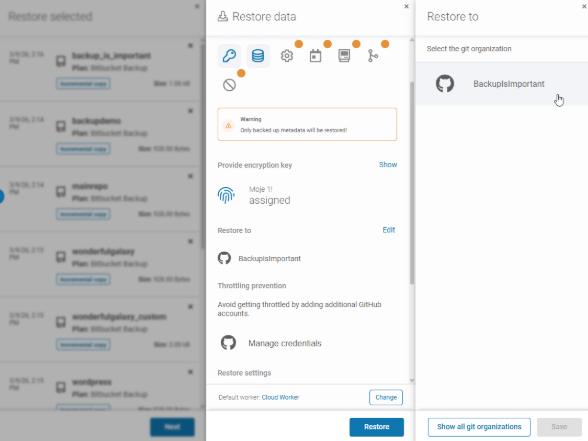
In short, you can make a copy of your Bitbucket repositories (plus metadata), then restore them to a new or existing GitHub organization – as the data recovery destination. And basically, that’s the whole process.
Begin by selecting your GitProtect organization.
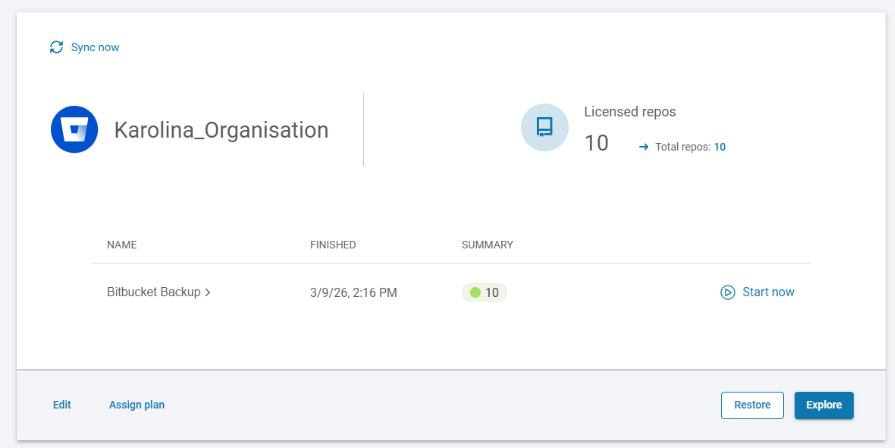
Click the Restore button.

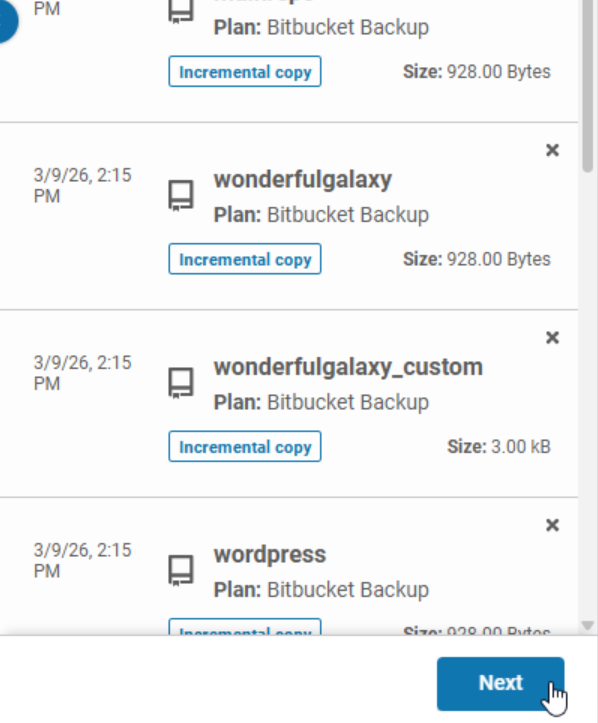
Specify the repository which needs to be restored.
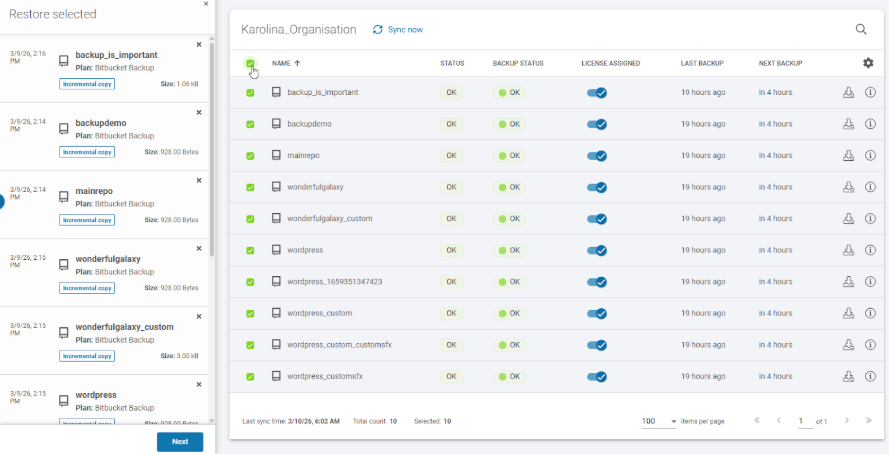
Once the repo is selected, press Next.
A panel appears allowing you to select the restore destination.
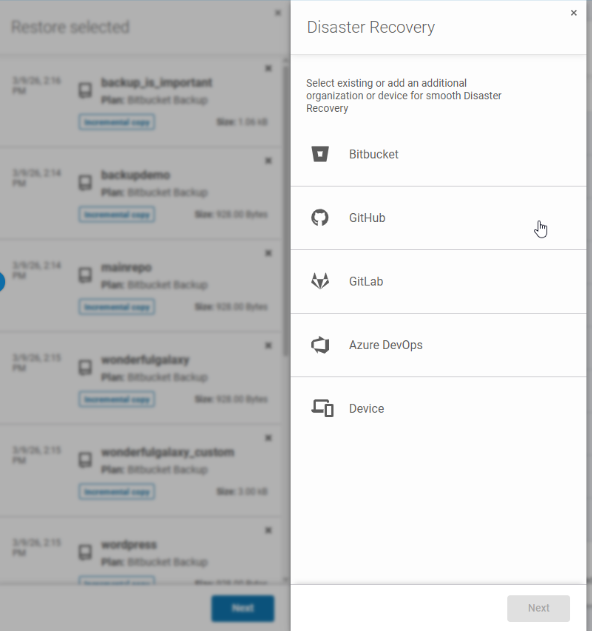
Select GitHub, and press Next.
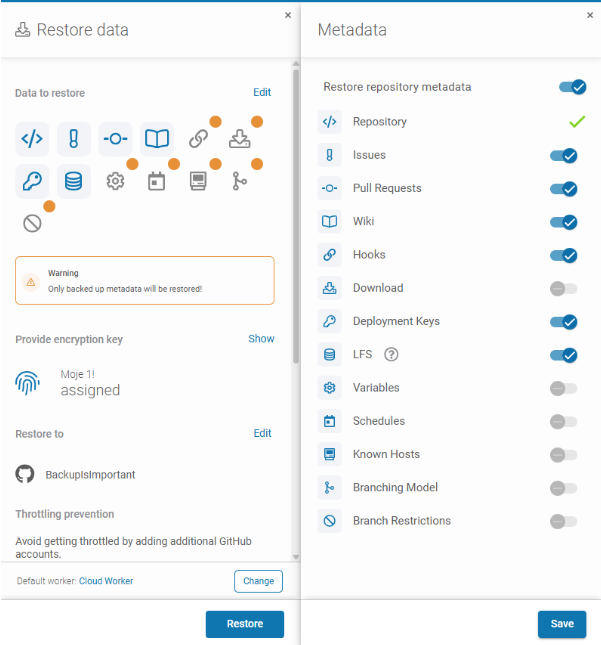
Now, you will see a warning that some metadata is not transferred due to platform limitations during the Bitbucket to GitHub migration.

Next, you get the details regarding metadata.
Here you can additionally verify which organization you are restoring to (this step can be skipped).
Now, onto restore settings – if a repository with the same name already exists in GitHub, you can add suffixes (repositories with identical names will be skipped; we never overwrite existing ones).
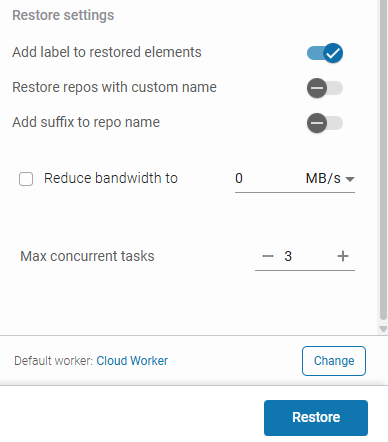
After clicking Restore, the restore task can be viewed in the Tasks tab.

That’s the whole process. The repos you migrated are now visible in your Git hosting service and the GitProtect window.
What you gain using the GitProtect tool for DevOps
GitProtect offers a comprehensive disaster recovery solution for DevOps teams. It provides granular restore capabilities, flexible deployment options, and enterprise-grade security.
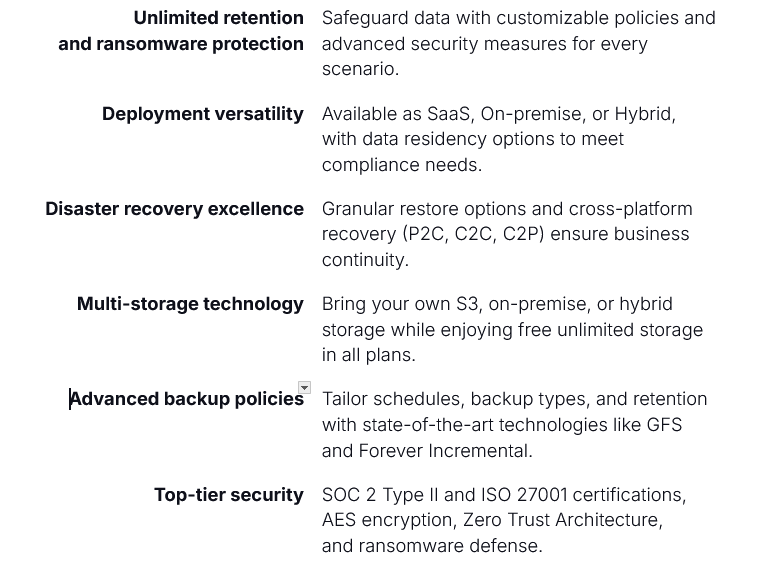
Benefits of utilizing GitProtect capabilities.
Summary
Migrating from Bitbucket to GitHub transforms performance, collaboration, and development workflows. A well-planned transition can help your repositories thrive in a platform that offers:
- seamless compatibility with Slack, Jira, and thousands of GitHub Marketplace apps
- support for repositories of various sizes with features like Git Large File Storage (LFS)
- advanced features like pull request automation, Discussions, and code review workflows
- adaptable workflows with GitHub Actions for CI/CD and reusable templates for efficient automation
- built-in tools such as secret scanning and branch protection rules
- a vibrant developer network for open-source and private project collaboration.
Utilizing GitProtect capabilities, you can streamline migration while reinforcing data protection and ensuring operational continuity across cloud-hosted or self-managed environments.
The tool automates backups while adhering to the 3-2-1 strategy, delivering a comprehensive and secure data protection standard for GitHub repositories.
Frequently Asked Questions
How do I move a Bitbucket repository to another repository?
To move your Bitbucket repository to another repository, let’s say GitHub, you have a few options – Git Clone, GitHub Importer, or a third-party backup and restore tool with the cross-over recovery option.
- The first method involves cloning your Bitbucket repository to your local machine using Git with the consequent pushing it to the new destination. This hands-on approach ensures control over the process but requires manual configuration and execution.
- GitHub Importer is another available option (attention – thei method is suitable only for Cloud versions!) that can a bit automate the process of transferring. All you need to do is provide your URL and specify details.
- Cross-over recovery of a third-party backup tool, like GitProtect.io offers. In this case, you can simply back up your Bitbucket data and restore it to GitHub (or GitLab if needed).
For those who is transitioning from Bitbucket Server (due to Atlassian end of support) to GitHub Enterprise Cloud, you can use GitHub CLI’s BBS2GH extension that provides a command-line interface for migration. After installing the extension and setting up the necessary credentials, users can simply migrate repositories if there is need.
Does GitHub copilot work with Bitbucket?
GitHub Copilot is an AI-powered tool that assists in writing source code and you can easily integrate it into your GitHub projects. But what about Bitbucket? The answer is on the ground – unfortunately, Bitbucket doesn’t have direct integration with Bitbucket repositories nowadays. Why? GitHub Copilot operates inside the GitHub ecosystem. It means that it provides coding support only for GitHub-hosted projects. If you want to start using Copilot for a project that is currently hosted on Bitbucket, you first need to move the repository to GitHub.
How do I clone a Bitbucket repository with all branches?
To clone a Bitbucket repository with all branches, you should use the git clone command:git clone –mirror <Bitbucket_repository_URL>. This command permits you to clone your Bitbucket repository with all its branches and tags.
However, you should understand that git clone isn’t a backup. Thus, if you perform a git clone only to have a copy of your Bitbucket repository data, you can’t be sure that in case of a disaster, you will be able to restore your critical data. Moreover, if you need to meet compliance and security requirements, its better to have a professtional backup and DR for Bitbucket that operates within the backup best practices.
How do I copy a branch from Bitbucket to GitHub?
If you want to copy only a branch from Bitbucket to GitHub, you can use Git commands to fetch, switch, and push branches between repositories. First, you should fetch the branch from the Bitbucket repository using git fetch origin <branch_name> to retrieve it locally. Then, you need to switch to the desired branch using git checkout <branch_name>. and finally, push the branch to the GitHub repository with git push origin <branch_name>.
However, there is another option, as well. With GitProtect.io, you can make a copy of your Bitbucket repository and its metadata, including branches, and restore it cross-overly to GitHub.
How do I export data from Bitbucket?
If you need to export data from Bitbucket, you can go to your Bitbucket repository setting and there, choosing Import & export, select the file you want to import. However, this option only allows you to export Bitbucket issues if you need to move those issues between repositories.
In case when you want to export projects and repositories from your Bitbucket Server to the Bitbucket Data Center, you can use Data Center Migration. However, this feature is only available to Bitbucket DC users and allows to export not the entire Bitbucket environment but only specific data, including git, pull requests, project settings, and repository settings.
When it comes to exporting data as a backup, it’s better to opt for a comprehensive backup. Yet make sure that it has full data coverage, automated scheduled backup policies, multi-storage compatibility, replication, long-term retention, ransomware protection, comprehensive restore and Disaster Recovery, etc.
Before you go:
✍️ Subscribe to GitProtect DevSecOps X-Ray Newsletter and always stay up-to-date with the latest DevOps and security insights
📚 Find out the top reasons why back up DevOps tools during the migration process
🔎 Download the GitHub backup guide to always have it at hand and know what to do in emergencies
📅 Schedule a live custom demo and learn more about GitProtect backups for your DevOps data protection
📌 Or try GitProtect backups for your GitLab, Bitbucket, GitHub, or Jira ecosystem to guarantee data protection and ensure continuous workflow