
How To Create a New Branch In GitHub?
SUMMARY
- Understand the core role of branches in keeping your main codebase stable during parallel development.
- Learn step-by-step how to create new branches using the GitHub web interface command line or desktop tools.
- Explore advanced version control techniques including orphan branches and starting from specific older commits.
- Master everyday best practices for switching, merging, and safely deleting branches to keep your repository organized.
Managing different features and fixes without tangling the core code is crucial. This is where the understanding of branching in GitHub enters the chat. Think of a branch in GitHub as a parallel universe for your project, where you can experiment, develop, and refine new features or fixes, all without impacting the main codebase.
Git branches function as separate versions of the main repository, allowing users to work on different parts of a project without affecting the main branch. It’s a fundamental practice that not only keeps your project organized but also creates a flexible and collaborative development environment. Branches are often created on the local machine before being pushed to the remote repo.
Understanding these techniques will not only make you a branch master but also improve your workflow, ensuring that your development process is as streamlined and error-free as possible. So, let’s begin this journey to analyze the practicalities and strategies of managing branches effectively in GitHub.
What is a git branch?
In Git, a branch can be thought of as a unique set of code changes with a distinct name. Much like a real tree branch, it stems from the main trunk (the main or master branch) and has its own path of growth. Git handles branches uniquely — each branch is just a movable pointer to a commit, which makes creating and managing branches fast and lightweight. In simpler terms, a branch in GitHub typically diverges from the main trunk, often known as the master branch, allowing parallel development. Just check out the git branch benefits:
- Isolated environments: Each branch serves as a sandbox for specific tasks, whether it’s for feature development, bug fixing, or experimentation, ensuring the main codebase remains stable.
- Parallel development: Branches enable multiple team members to work on different aspects of the project simultaneously, improving collaboration and speeding up development.
- Risk reduction: Changes in a branch do not affect the main codebase, which maintains overall project stability.
What are the reasons for creating a new branch? Well, they can be different. You may need to create a feature branch for focused and isolated development, a bugfix branch to address and test fixes separately, or an experimental branch to keep untested changes away from the main codebase. Everything depends on your needs. Using Git commands like git branch and git checkout, you can create and manage new branches within a version control system, initiating new features by creating new branches off the main branch.
These different branches, each serving a specific purpose, ensure that the development process is streamlined and manageable, regardless of the project’s size or complexity. Git’s branching model supports fast, efficient development, making sure developers can create, merge, and delete branches in a git repo without overkill.
Ways to create a new branch in GitHub
Mastering is essential for managing code changes effectively. For example, you can create a new branch specifically for a feature or bug fix to keep your main codebase clean and organized. New branches are usually branch-based, which stem from a concrete base branch or commit. Let’s outline multiple methods to suit your workflow preferences.
Creating a branch via the branches overview
Creating a new branch directly from the GitHub web interface is a straightforward process that doesn’t require any command-line tools. It’s particularly useful for those who prefer a more visual approach or for quick branch creation without leaving the browser.
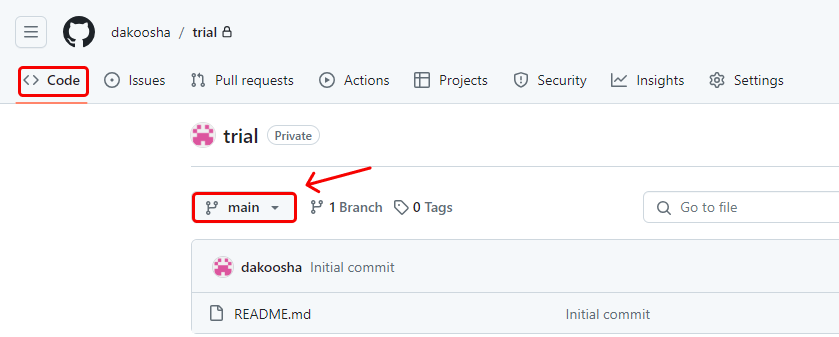
- Go to the main page of your repository on GitHub.
- As soon as you open the repo, the “Code” tab will be the first thing you see. Click on the “Main” button a little below it.
3. Then you will see a small window where you will need to provide a name for your new branch. Here you can specify branch details:
- Under “Branch name”, enter a name for your new branch.
- Under “Branch source”, select the source from which you want to create the branch. By default, it will be the current default branch of the repo.
- If your repository is a fork, you also have the option to choose whether the branch should be created in your fork or the upstream repo.
Click “Create branch” to finalize the process.
Creating a branch using the branch dropdown
For a quick creation of a new git branch from any page within your repository, you should:
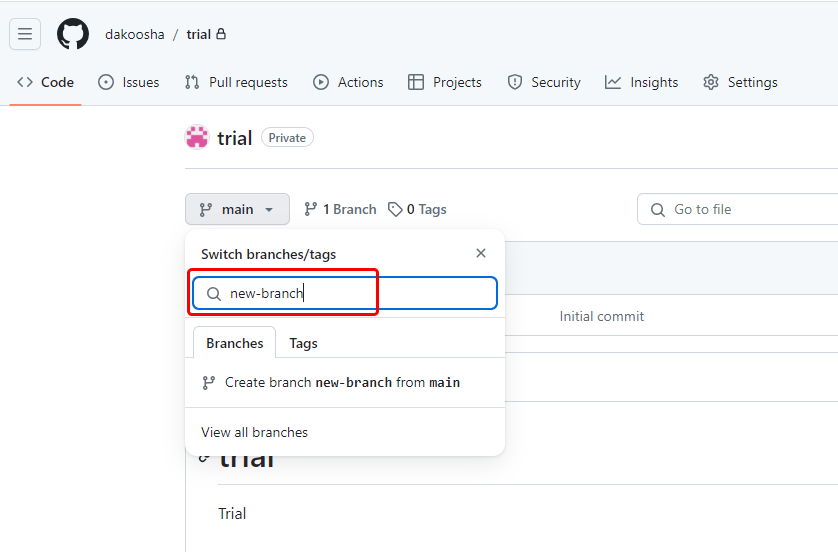
- Open the branch dropdown: On the main page of your repo, locate the branch dropdown menu. It’s typically at the top of the file tree view or integrated file editor.
- Enter new name: In the “Find or create a branch…” text field, type a unique name for your new branch.
- Create and switch: Once you create a new branch, you can easily switch branches within the GitHub interface.

Creating a new branch using the command line
It’s possible to do almost anything in GitHub using the command line, and the command prompt is a key tool for executing Git commands. The git checkout command helps you switch or create branches locally, while git clone is used to fetch a repository in the first place. Creating a new branch is not an exception. This approach is both simple to use and has no significant drawbacks. However, you should remember that if you use it locally, other users won’t see your modification until you push it to the remote branch. Thus, your “new” version of the GitHub repo can become too different from the master copy, the existing branch.
So, here is the way to create a new branch via the command line:
- Access your command line interface.
- Make sure you’re in the directory of your local Git repository.
- Create the branch:
To create a new branch and remain on your current branch:
git branch <your-git-branch-name>To create a new branch and switch to it immediately:
git checkout -b <your-git-branch-name>This command starts the branch from the current HEAD, making it easy to branch off your latest commit.
💡 Note: When you create a new local branch using this method, it’s initially only available in your local repo. To share the new local branch with your team, push it to the remote repository using: git push -u origin < your-git-branch-name>. Once merge conflicts are resolved, you should run the command git add on each file to mark it as resolved, to stage the file in Git, and indicate that you are ready to proceed with the merge process. After completing adding the files, simply merge by committing the changes.
Orphan branches
An orphan branch is a branch with no commit history. It’s useful for starting from scratch within an existing repo or for documentation purposes.
- Create an orphan branch: Use the command git checkout –orphan <your-git-branch-name> in your command line. This will create a new branch, but unlike regular branches, it has no shared history with the main branch.
- Initial commit: As this branch has no history, start by creating an initial commit. The initial commit, often called the ‘first commit,’ defines the starting point of the new branch’s history.
Remember, when working with orphan branches, you’re essentially starting a new history independent of your main project’s history.
Are there any other branching alternatives?
Branching in Git is not limited to the standard methods. There are several other alternatives that cater to different preferences and project requirements. Exploring these can enhance your workflow efficiency and adaptability. Why not look at them more precisely?
Additionally, it is important to merge changes back into the main project to maintain clean and effective version control.
Advanced command-line techniques
For developers who are comfortable with the command line, Git offers a suite of advanced features for branch management beyond the current branch and other branches. These include:
- Checking out remote branches: git checkout –track origin/<branchname> to create a local branch that tracks a remote branch in your remote repo. This is particularly useful for collaborating on branches that are in the remote repository but not yet in your local one.
- Renaming branches: git branch -m <oldname> <newname> helps in renaming a branch, especially useful if the scope or purpose of the branch changes.
- Deleting branches: Carefully use git branch -d <branchname> to delete a branch once its changes have been merged or are no longer needed. Developers often compare and merge two branches to integrate them and resolve differences.
By using these advanced Git commands, you can create and manage your desired new branches efficiently. This way, you make space for more complex workflows and better project organization.ed new branches efficiently. This way, you make space for more complex workflows and better project organization.
GitHub desktop
GitHub Desktop simplifies Git commands into a user-friendly interface. It’s particularly useful for those who prefer a GUI over command-line operations. Here are the step-by-step instructions to create branches using this method:
- Go to the ‘Current Repository’ view, choose the branch you want as your base, and click ‘New Branch’.
- Name your branch and click ‘Create’. To make it available on GitHub, click ‘Publish branch’.
IDE integration
Many Integrated Development Environments (IDEs) now have built-in Git support, allowing you to manage branches within the IDE itself. This integration allows you to directly create and switch between branches without leaving the IDE environment. Some IDEs provide a graphical representation of the branch history, making it easier to understand the project’s branching structure.
Each of these alternatives offers unique benefits. The choice of method often depends on personal preference, project needs, and the complexity of the tasks at hand.
Creating a branch from a specific point
Sometimes you may need to start a branch not from the latest commit, but from an earlier point in your project’s history (a commit or tag). This is especially useful for developing a new feature, fixing a bug, or experimenting without relying on the current branch tip.
You can create a new branch from a chosen commit or tag with the git branch command, followed by the branch name and the commit hash or tag. If you want to both create and switch to the branch in one step, you can use the git checkout command -b (or git switch -c in newer Git versions).
Branching from a stable commit lets you isolate changes, ensuring that your new work doesn’t disrupt ongoing development. With the Git branch command, you can create, switch, and manage branches at any point in the repository’s history, keeping your workflow flexible and organized.
Managing existing branches
When it comes to managing your existing branches, remember that it is an essential part of the Git workflow. Proper branch management guarantees that your repos stay organized, as well as your development processes become more efficient. Let’s take a look at the tips to help you with the management of your branches.
Best practices for branch management
For starters, in order to see all existing branches in your local repository, use the git branch command and run it with no arguments. This will display a list of your current branches. However, you can also use the -merged and -no-merged options to filter this list to show only branches that you have or have not yet merged into the branch you’re currently on.
Remember that once a branch has already been merged with another branch, you can simply delete it by using the git branch -d <branch-name> command. After merging changes, you can close the related issue or ticket and then delete the branch. This helps keep your repository tidy and organized by removing branches that are no longer of any use. On this list, branches without the * in front of them can be deleted using git branch -d;. That is because you have incorporated them into another branch; therefore, no data will be lost. When it comes to deleting a branch that has not yet been merged with any other branch, git branch -d will not work. To force delete, you should add -D to the command in order to erase the work. However, always make sure to have your data backed up before any deletions to keep it secure and available.
Next, we have switching between branches. You can use the git checkout <branch-name> command to effectively switch between branches. This should permit you to move from one branch to another in most cases. Now, to merge changes from one branch into another, use the git merge command. When there are no divergent changes between the two branches, Git may do a fast forward merge instead of creating an extra merge commit. This way, you integrate the changes from the specified branch into your current one.
Useful commands to switch between branches
Let’s take a look at how to switch between branches in more detail, as it is a common operation in Git. It allows you to move between different lines of development, from testing to production.
- Simply switch branches using “git checkout <branch-name>”. Switching branches updates your files to match the selected branch and can affect the working tree if you have pending edits.
- Create and switch to a new branch, run “git checkout” with adding “-b” in order to specify the branch name. Alternatively, in Git 2.23, use the “git switch” command, and use the create-branch option: “-c <branch-name>”. This newer command is convenient when starting a new feature or following a simple branch based workflow.
- Switch to the previous branch by running “git switch -“.
- To view commit history, use “git log” that will show you all commits made so far in the working directory.
- Check the current status by running “git status”.
Now, by following these couple of pointers, you can switch between branches more efficiently, and in turn guarantee that your development process remains smooth as well as organized.

Takeaway
To sum up, mastering branching in GitHub is a crucial skill for effective version control and team collaboration. Whether it’s through the straightforward methods provided by the GitHub interface or the more advanced command-line techniques, each approach offers unique benefits tailored to different project needs. Understanding these methods allows you to leverage branching to its full potential, enhancing code management, facilitating parallel development, and ensuring smooth project progress.
Remember, the effectiveness of branching largely depends on how well it’s integrated into your team’s workflow, making it an essential aspect of modern software development. After finishing work on a branch, teams often open a pull request before merging changes into the main branch. You can read more about git branching strategies in our blog post: From Novice to Pro: Understanding Git Branching Strategies.
And don’t forget about the importance of keeping your GitHub data safe and secure in the event of a disaster. Try GitProtect.io backups for GitHub and ensure compliant DevOps backup and recovery with a 14-day trial 🚀.
Before you go
🔎 Learn more about GitHub security best practices to ensure your DevOps environment is safe and sound
🔎 Find out which GitHub backup best practices can help you always stay afloat
🔎 Continue mastering your GitHub issues – check our GitHub issues best practices and PRO tips
🔎 Explore the key DevOps pillars and top 15 DevOps principles to optimize your development workflow.